
Owner's Manual


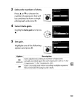

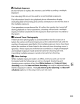
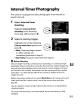
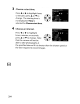
Table Of Contents
- Using the Supplied Manuals
- Quick Start Guide
- Owners Manual
- Two-Button Reset
- Setting Language / Time / Date
- Table of Contents
- Q & A Index
- Supplied Accessories
- Parts & Controls
- Getting Started
- Basic Photography
- Basic Playback
- Image Area
- Image Quality
- Image Size
- Focus
- Release Mode
- ISO Sensitivity
- Exposure
- White Balance
- Image Enhancement
- Flash Photography
- Other Shooting Options
- More Playback Options
- Connecting to Other Devices
- Menu Guide
- Playback Menu - Managing Images
- Shooting Menu - Shooting Options
- Shooting Menu Bank
- Reset Shooting Menu
- Active Folder
- File Naming
- Image Quality
- Image Size
- Image Area
- JPEG Compression
- NEF (RAW) Recording
- White Balance
- Set Picture Control
- Manage Picture Control
- Color Space
- Active D-Lighting
- Vignette Control
- Long Exposure NR
- High ISO NR
- ISO Sensitivity Settings
- Live View
- Multiple Exposure
- Interval Timer Shooting
- Custom Settings - Fine Tuning the Camera
- Setup Menu - Camera Setup
- Format Memory Card
- LCD Brightness
- Clean Image Sensor
- Lock Mirror Up for Cleaning
- Video Mode
- HDMI
- World Time
- Language
- Image Comment
- Auto Image Rotation
- Dust Off Reference Photo
- Battery Information
- Wireless Transmitter
- Image Authentication
- Copyright Information
- Save / Load Settings
- GPS
- Virtual Horizon
- Non-CPU Lens Data
- AF Fine Tune
- Firmware Version
- Retouch Menu - Creating Retouched Copies
- My Menu - Creating a Custom Menu
- Compatible Lenses
- Optional Flash Units
- Other Accessories
- Care / Maintenance
- Troubleshooting
- Error Messages
- Defaults
- Memory Card Capacity
- Specs
- Index
- 24-120mm Lens Instruction Manual
- Software Installation Instructions
- Scans of Software CD-ROMs
- AC Power Cord Specs
- Warranty

Interval Timer
Photography
The camera
is
equipped
to
take photographs automatically at
preset intervals.
-_._----------_._-----_._-----_.
__
..
_-------
..
_
__
..
-
_._--------
..
_. _.. -
._--_
..
1 Select Interval
timer
shooting.
Highlight
Interval
timer
shooting
in
the
shooting
menu (pg. 268) and press
~.
CI
SHOOTING
MENU
o
Active
D-Lighting
._
Vignette
control
~
Long
expo
NR
High
ISO
NR
t>'
ISO
sensitivity
settings
f1o:
Live
view
Multiple
exposure
Interval
timer
shooting
OFF
~N
OFF
NORM
~
~
OFF
I
OFF
2 Select a
starting
trigger.
Highlight
one
of
the
following
Choose
start
time
options and
press
~.
•
Now:
Shooting begins
about
3 s after settings are
completed (proceed
to
Step 4).
•
Start
time: Choose a start
time
(see
Step
3).
~
Before
Shooting
Choose single-frame
(5),
continuous
low
speed ((L), or continuous high
101
speed
((H)
release
mode
when
using
the
interval timer. Before beginning
interval
timer
photography, take a test
shot
at current settings and
view
the
results in
the
monitor. Remember
that
the
camera will focus before
each
shot-no
shots will be taken
if
the
camera
is
unable
to
focus in
single-servo
AF.
Before choosing a starting time, select
World
time
in
the
setup menu and
make sure
that
the
camera clock
is
set
to
the
correct
time
and date
(pg.38).
Use
of
a
tripod
is
recommended.
Mount
the
camera on a
tripod
before
shooting begins.
To
ensure
that
shooting
is
not
interrupted, be sure
the
battery
is
fully
charged.
203