
Owner's Manual
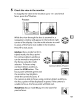


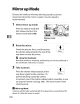
Table Of Contents
- Using the Supplied Manuals
- Quick Start Guide
- Owners Manual
- Two-Button Reset
- Setting Language / Time / Date
- Table of Contents
- Q & A Index
- Supplied Accessories
- Parts & Controls
- Getting Started
- Basic Photography
- Basic Playback
- Image Area
- Image Quality
- Image Size
- Focus
- Release Mode
- ISO Sensitivity
- Exposure
- White Balance
- Image Enhancement
- Flash Photography
- Other Shooting Options
- More Playback Options
- Connecting to Other Devices
- Menu Guide
- Playback Menu - Managing Images
- Shooting Menu - Shooting Options
- Shooting Menu Bank
- Reset Shooting Menu
- Active Folder
- File Naming
- Image Quality
- Image Size
- Image Area
- JPEG Compression
- NEF (RAW) Recording
- White Balance
- Set Picture Control
- Manage Picture Control
- Color Space
- Active D-Lighting
- Vignette Control
- Long Exposure NR
- High ISO NR
- ISO Sensitivity Settings
- Live View
- Multiple Exposure
- Interval Timer Shooting
- Custom Settings - Fine Tuning the Camera
- Setup Menu - Camera Setup
- Format Memory Card
- LCD Brightness
- Clean Image Sensor
- Lock Mirror Up for Cleaning
- Video Mode
- HDMI
- World Time
- Language
- Image Comment
- Auto Image Rotation
- Dust Off Reference Photo
- Battery Information
- Wireless Transmitter
- Image Authentication
- Copyright Information
- Save / Load Settings
- GPS
- Virtual Horizon
- Non-CPU Lens Data
- AF Fine Tune
- Firmware Version
- Retouch Menu - Creating Retouched Copies
- My Menu - Creating a Custom Menu
- Compatible Lenses
- Optional Flash Units
- Other Accessories
- Care / Maintenance
- Troubleshooting
- Error Messages
- Defaults
- Memory Card Capacity
- Specs
- Index
- 24-120mm Lens Instruction Manual
- Software Installation Instructions
- Scans of Software CD-ROMs
- AC Power Cord Specs
- Warranty

~
Shooting in Live View
Mode
Although they will
not
appear in the final picture, banding or distortion
may be visible in the
monitor
under fluorescent, mercury vapor, or sodium
lamps or
if
the camera
is
panned horizontally or
an
object moves at high
speed
through
frame. Bright
light
sources may leave after-images in
the
monitor
when
the
camera
is
panned. Bright spots may also appear. When
shooting in live view mode, avoid pointing the camera at the sun or other
strong
light
sources. Failure
to
observe this precaution could result in
damage
to
the
camera's internal circuitry.
Live view shooting ends automatically
if
the lens
is
removed.
Metering can
not
be changed in live view mode. Choose a metering
~
method
before selecting live view mode.
~
Live view mode can be used for
up
to
an hour.
Note, however,
that
when used in live view mode
for extended periods, the camera may become
noticeably warm and the temperature
of
its
internal circuits may
rise,
resulting in image noise
and unusual colors.
To
prevent damage
to
the
camera's internal circuits, live view shooting will
end automatically before the camera overheats. A count-down display
will appear in
the
monitor
30
s before shooting ends. At high ambient
temperatures, this display may appear immediately when live view mode
is
selected.
Close the viewfinder eyepiece shutter after focusing. This prevents
light
entering via
the
viewfinder from interfering
with
exposure.
To
reduce blur in
tripod
mode, choose On for Custom Setting d9
(Exposure delay mode, pg. 302).
100