
Owner's Manual


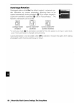
Table Of Contents
- Quick Start Guide
- Owners Manual
- Reset
- Reset Custom Settings (Custom Menu Item)
- Two-Button Reset (Does Not Affect Custom Settings)
- Clock Set (Setup Menu Item)
- Image Quality & Size
- Table of Contents
- Introduction
- Supplied Accessories
- Parts & Controls
- Getting Started
- Basic Operation
- Advanced Operation
- Using the Camera Menus
- Optional Accessories
- Maintenance
- Troubleshooting
- Error Messages & Displays
- Available Settings & Default Values
- Using the Command Dial
- Memory Capacity / Image Size
- Specs
- Index
- Scans of Software CD-ROMS
- Scans of Supplied DVDs
- 55-200mm Lens Information
- Warranty for Supplied Lenses
- Warranty Extension Offer for Supplied Lens
- Camera Warranty

Classic
format
is
shown below.
Mode
4
Shutter speed
39-44
Auto
ISO
sensitivity indicator
76
Optimize image indicator
68
Focus
area
display
14, 16,
24,
25,
26
AF-area
mode
24
"Beep" indicator
74
Battery indicator
15
Number
of
exposures remaining
15,
116
Preset
white
balance recording indicator
71
PC
mode
indicator 56
Manual flash control indicator
78
Flash
compensation indicator for
optional Speedlight
99
Electronic analog exposure display 43
Exposure compensation 47
Aperture (f/-number)
39-44
Flash
sync
mode
35
Exposure compensation value 47
Help indicator 3
Flash
compensation value 48
Metering
mode
45
AF-area
mode
24
Focus
mode
23
Shooting
mode
32
ISO
sensitivity
37
White balance
mode
49
Image
size
30
Image quality
30
The design
of
the Wallpaper format
is
the same
as
the Graphic
display except that a user-selected photograph
is
displayed
in
the
background, the background color for the menus differs, and the
shutter speed and aperture displays
are
not
displayed
6).
To
choose a photograph for the Wallpaper format:
1 Highlight Select wallpaper and
press
the multi selector
right. The photographs on the memory card will be displayed
as
shown at right.
2
Press
the
multi selector left or right
to
highlight a photograph.
To
view the highlighted photograph full screen,
press
and
hold
the
CI
button.
3
Press
OK
to
select the highlighted picture and return
to
the setup menu.
82
I
Menu
Guide/Basic
Camera
Settings:
The
Setup
Menu