
Owner's Manual

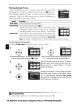
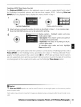


Table Of Contents
- Quick Start Guide
- Owners Manual
- Reset
- Reset Custom Settings (Custom Menu Item)
- Two-Button Reset (Does Not Affect Custom Settings)
- Clock Set (Setup Menu Item)
- Image Quality & Size
- Table of Contents
- Introduction
- Supplied Accessories
- Parts & Controls
- Getting Started
- Basic Operation
- Advanced Operation
- Using the Camera Menus
- Optional Accessories
- Maintenance
- Troubleshooting
- Error Messages & Displays
- Available Settings & Default Values
- Using the Command Dial
- Memory Capacity / Image Size
- Specs
- Index
- Scans of Software CD-ROMS
- Scans of Supplied DVDs
- 55-200mm Lens Information
- Warranty for Supplied Lenses
- Warranty Extension Offer for Supplied Lens
- Camera Warranty

Menu
Guide
Using
Camera
Menus
Most shooting, playback, and setup options can be accessed from
the
camera menus.
To
view
the
menus, press
the
e
button.
Choose from playback, shooting,
Custom Settings, setup, and
retouch menus
(see
below)
If
//?//
icon
is
displayed, help for the
current item can be viewed by
pressing
CD
button
Slider shows position in current
menu
Current setting for each option
is
shown by icon
L..--
__
Current menu item
is
highlighted
Menu
~
Playback
Q
Shooting
~
Custom
Settings
1J
Setup
@1
Retouch
Description
Adjust playback settings and manage photos 65).
Adjust shooting settings
(tfj
68).
Personalize camera settings
(~
74).
Format
memory
cards and perform basic camera setup (
80).
Create retouched copies
of
existing photographs (
89).
I
The
multi
selector and
OK
button
are
used
to
navigate
the
camera menus.
Return
to
previous
menu
Press
left
Press
right
Display
sub-menu
Menu
Guide/Using
Camera
Menus
I
63