
Owner's Manual

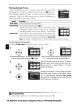
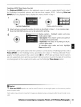


Table Of Contents
- Quick Start Guide
- Owners Manual
- Reset
- Reset Custom Settings (Custom Menu Item)
- Two-Button Reset (Does Not Affect Custom Settings)
- Clock Set (Setup Menu Item)
- Image Quality & Size
- Table of Contents
- Introduction
- Supplied Accessories
- Parts & Controls
- Getting Started
- Basic Operation
- Advanced Operation
- Using the Camera Menus
- Optional Accessories
- Maintenance
- Troubleshooting
- Error Messages & Displays
- Available Settings & Default Values
- Using the Command Dial
- Memory Capacity / Image Size
- Specs
- Index
- Scans of Software CD-ROMS
- Scans of Supplied DVDs
- 55-200mm Lens Information
- Warranty for Supplied Lenses
- Warranty Extension Offer for Supplied Lens
- Camera Warranty

Viewing
Photographs
on
TV
IT]
Connect to cameraConnect to video device
2
Turn
the
camera
off.
Always
turn
the
camera
off
before con-
necting or disconnecting
the
video cable.
3 Connect
the
video cable
as
shown.
An EG-Dl 00 video cable (available separately; 103) can be used
to
connect
the
camera
to
a television or
VCR
for playback or recording.
Use
of
an
optional
EH-5
AC
adapter and
EP-5
AC
adapter connector
is
recommended for extended playback ( 103).
1 Choose
the
appropriate video
mode
(
83).
Turn
the
camera on and
press
e
to
begin playback. During
playback, images will be displayed on
the
television or
recorded
to
video tape;
the
camera
monitor
will remain off.
4 Tune
the
television
to
the
video channel.
S
62
I
Reference:
Connecting
to
a
Computer,
Printer,
or
TVlViewing
Photographs
on
TV