
Owner's Manual

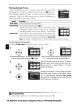
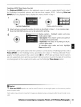


Table Of Contents
- Quick Start Guide
- Owners Manual
- Reset
- Reset Custom Settings (Custom Menu Item)
- Two-Button Reset (Does Not Affect Custom Settings)
- Clock Set (Setup Menu Item)
- Image Quality & Size
- Table of Contents
- Introduction
- Supplied Accessories
- Parts & Controls
- Getting Started
- Basic Operation
- Advanced Operation
- Using the Camera Menus
- Optional Accessories
- Maintenance
- Troubleshooting
- Error Messages & Displays
- Available Settings & Default Values
- Using the Command Dial
- Memory Capacity / Image Size
- Specs
- Index
- Scans of Software CD-ROMS
- Scans of Supplied DVDs
- 55-200mm Lens Information
- Warranty for Supplied Lenses
- Warranty Extension Offer for Supplied Lens
- Camera Warranty

Printing
Multiple
Pictures
To
print
multiple
pictures or create
an
index print listing
all
JPEG
photographs
as
small thumbnail images, press
the
GIl
button
in
the
PictBridge playback display. The menu shown at right will be
displayed.
Press
the multi selector
up
or
down
to
highlight
an
option
and press
to
the right
to
select.
Option
Description
Print select
Print selected pictures
(see
below).
Print (DPOF) Print current
DPOF
print order
61).
Index
print
Create index print
of
all
JPEG
photos,
to
maximum
of
256.
Confirmation dialog shown at right will be displayed;
press
OK
to
display menu
of
print options. Choose page
size,
border, and
time
stamp options
as
described on pre-
ceding page (warning will be displayed
if
selected page
size
is
too
small).
To
start printing, highlight Start
print-
ing and
press
OK.
PictBridge menu will be displayed
when
printing
is
complete.
Printing Selected Photographs
Choosing Print select displays the menu shown
in
Step
1.
21
~
~
Scroll
through
pictures.
To
display current pic- Select current picture and set number
of
prints
ture full screen,
press
and hold
CI
button.
to
1.
Selected pictures marked by
~
icon.
3.
Specify number
of
prints (up
to
99).
To
deselect
picture, press multi selector
down
when num-
ber
of
prints
is
1. Repeat Steps 1- 3
to
select
additional pictures.
4
Display print options. Choose page
size,
border,
and time stamp options
as
described on page
59.
To
start printing, highlight Start printing
and
press
OK.
PictBridge menu will be displayed
when printing
is
complete.
mInterrupting
Printing
To
cancel printing and return
to
the PictBridge playback display,
press
OK.
60
I
Reference:
Connecting
to
a
Computer,
Printer,
or
TV/Printing
Photographs