
Owner's Manual

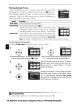
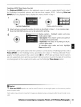


Table Of Contents
- Quick Start Guide
- Owners Manual
- Reset
- Reset Custom Settings (Custom Menu Item)
- Two-Button Reset (Does Not Affect Custom Settings)
- Clock Set (Setup Menu Item)
- Image Quality & Size
- Table of Contents
- Introduction
- Supplied Accessories
- Parts & Controls
- Getting Started
- Basic Operation
- Advanced Operation
- Using the Camera Menus
- Optional Accessories
- Maintenance
- Troubleshooting
- Error Messages & Displays
- Available Settings & Default Values
- Using the Command Dial
- Memory Capacity / Image Size
- Specs
- Index
- Scans of Software CD-ROMS
- Scans of Supplied DVDs
- 55-200mm Lens Information
- Warranty for Supplied Lenses
- Warranty Extension Offer for Supplied Lens
- Camera Warranty

Cropping
If Crop
is
selected, dialog shown at right will be displayed.
Use
8 and G buttons
to
choose
size
of
crop and
use
multi
selector
to
choose position
of
crop.
Press
OK
to
return
to
print
menu.
Printing Pictures One
at
a Time
To
print
the
picture currently selected in the PictBridge playback
display, press
OK.
The menu shown at right will be displayed.
Press
the multi selector
up
or
down
to
highlight
an
option
and press
to
the right
to
select.
Page size
No.
of
copies
Border
Time
stamp
up
or down
to
choose page
size
from Printer default
(default page
size
for current printer), 3.SxSin., Sx7in.,
100xlS0mm,
4x6in.,
8xl0in.,
Letter,
A3,
or
A4,
then
press
OK
to
select and return
to
print menu.
Menu shown at right will be displayed.
Press
multi selector
upor
down
to
choose number
of
copies (maximum
99),
then
press
OK
to
select and return
to
print menu.
Menu shown at right will be displayed.
Press
multi selector
up or
down
to
choose print style from Printer default
(default for current printer), Print with border (print
photo
with
white border), or No border, then
press
OK
to
select and
return
to
print menu.
Menu shown at right will be displayed.
Press
multi selector
up or down
to
choose Printer default (default for current
printer),
Print time stamp (print time and date
of
recording
on photo), or
No time stamp, then
press
OK
to
select and
return
to
print menu.
Menu shown at right will be displayed.
To
exit
without
crop-
ping picture, highlight
No cropping and
press
OK.
To
crop
picture, highlight
Crop and
press
multi selector right.
To
start printing,
highlight
Start printing and
press
OK.
The PictBridge playback display will
be shown
when
printing
is
complete.
Page
Size,
Border,
and
Time
Stamp
Choose printer default
to
print at current printer settings. Only options supported by the current
printer
can
be
selected.
Reference:
Connecting
to
a
Computer,
Printer,
or
TV/Printing
Photographs
I
S9