
Owner's Manual


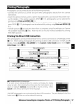

Table Of Contents
- Quick Start Guide
- Owners Manual
- Reset
- Reset Custom Settings (Custom Menu Item)
- Two-Button Reset (Does Not Affect Custom Settings)
- Clock Set (Setup Menu Item)
- Image Quality & Size
- Table of Contents
- Introduction
- Supplied Accessories
- Parts & Controls
- Getting Started
- Basic Operation
- Advanced Operation
- Using the Camera Menus
- Optional Accessories
- Maintenance
- Troubleshooting
- Error Messages & Displays
- Available Settings & Default Values
- Using the Command Dial
- Memory Capacity / Image Size
- Specs
- Index
- Scans of Software CD-ROMS
- Scans of Supplied DVDs
- 55-200mm Lens Information
- Warranty for Supplied Lenses
- Warranty Extension Offer for Supplied Lens
- Camera Warranty

Connecting
the
Printer
Before printing, check
that
the camera battery
is
fully charged. If in doubt, charge the bat-
tery or use
an
EH-5
AC
adapter and
EP-5
AC
adapter connector (available separately;
103).
1 Set
the
camera
USB
option
to
PTP
84).
2 Turn
the
printer on.
3 Turn
the
camera off.
I
4 Connect
the
supplied
USB
cable
as
shown. Do
not
use
force or
attempt
to
insert the
connectors at
an
angle. Connect the camera directly
to
the
printer;
do
not
connect
the
cable
via
a
USB
hub or keyboard.
5 Turn
the
camera on. A welcome screen will be displayed, fol-
lowed by the PictBridge playback display. Proceed
to
"Printing
Pictures One at a Time"
59)
or "Printing Multiple Pictures"
(~60).
Press
the
multi selector left or right
to
view additional photographs, or
press
the 8
but-
ton
to
zoom in on the current
photo
53).
To
view
six
photographs at a time,
press
the
G button.
Use
the multi selector
to
highlight
photographs, or
press
8
to
display
the
highlighted photograph full frame.
58
I
Reference:
Connecting
to
a
Computer,
Printer,
or
TV/Printing
Photographs