
Owner's Manual

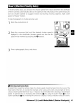


Table Of Contents
- Quick Start Guide
- Owners Manual
- Reset
- Reset Custom Settings (Custom Menu Item)
- Two-Button Reset (Does Not Affect Custom Settings)
- Clock Set (Setup Menu Item)
- Image Quality & Size
- Table of Contents
- Introduction
- Supplied Accessories
- Parts & Controls
- Getting Started
- Basic Operation
- Advanced Operation
- Using the Camera Menus
- Optional Accessories
- Maintenance
- Troubleshooting
- Error Messages & Displays
- Available Settings & Default Values
- Using the Command Dial
- Memory Capacity / Image Size
- Specs
- Index
- Scans of Software CD-ROMS
- Scans of Supplied DVDs
- 55-200mm Lens Information
- Warranty for Supplied Lenses
- Warranty Extension Offer for Supplied Lens
- Camera Warranty

Mode
A
(Aperture-Priority
Auto)
In
aperture-priority auto, you choose the aperture from values between the minimum and
maximum for the lens while the camera automatically selects the shutter speed that will
produce
the
optimal exposure.
Small
apertures (high f/-numbers) increase depth
of
field,
bringing both the main subject and background into focus. Large apertures (low
f/-num-
bers)
soften background details.
To
take photographs
in
aperture-priority auto:
1 Rotate the mode dial
to
A.
Rotate
the
command dial until the desired aperture
is
dis-
played in the viewfinder (aperture
can
also
be displayed
in
the
monitor by pressing the
~
button).
3 Frame a photograph, focus, and shoot.
42
I
Reference:
P,
S,
A,
and
M
Modes/Mode
A
(Aperture-Priority
Auto)