
Owner's Manual

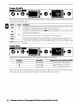

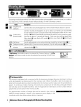


Table Of Contents
- Quick Start Guide
- Owners Manual
- Reset
- Reset Custom Settings (Custom Menu Item)
- Two-Button Reset (Does Not Affect Custom Settings)
- Clock Set (Setup Menu Item)
- Image Quality & Size
- Table of Contents
- Introduction
- Supplied Accessories
- Parts & Controls
- Getting Started
- Basic Operation
- Advanced Operation
- Using the Camera Menus
- Optional Accessories
- Maintenance
- Troubleshooting
- Error Messages & Displays
- Available Settings & Default Values
- Using the Command Dial
- Memory Capacity / Image Size
- Specs
- Index
- Scans of Software CD-ROMS
- Scans of Supplied DVDs
- 55-200mm Lens Information
- Warranty for Supplied Lenses
- Warranty Extension Offer for Supplied Lens
- Camera Warranty

Self-Timer and Remote Control Modes
The self-timer or optional ML
-L3
remote control
can
be used for self-portraits.
1
Mount
the camera on a tripod or place the camera on a stable,
level surface.
2 Select one
of
the following shooting modes:
Mode
Description
~10s
Self-timer Shutter
released
about
las
after
camera
has
focused.
~2s
Delayed remote
Shutter
released
about 2s after
camera
has
focused.
~
Qu
ick-response
Shutter
released
when
camera
focuses.
remote
5
Take
the
photograph.
Self-timer:
Press
the camera shutter-release button halfway
to
focus, then
press
it the
rest
of
the way
down
to
start the self-' =
timer. The self-timer lamp will start
to
blink, stopping
two
sec-
"'
onds before the photograph
is
taken.
~~o...........L.---L.-...u...L...orL..<L........o
Remote
control:
From
a distance
of
5m (16ft.) or
less,
aim the
transmitter on the ML
-L3
at the infrared receiver on the cam-
era
and
press
the shutter-release button on the
ML-L3.
In
delayed remote mode, the self-timer lamp will light for about
two
seconds before the shutter
is
released.
In
quick-response
remote mode, the self-timer lamp will flash after the shutter
has
been released.
3
Frame
the photograph. If the remote control
is
used with
the
camera
in
autofocus
mode, you
can
check focus by pressing the shutter-release
button
halfway.
4 Remove the viewfinder eyepiece cup and insert the supplied
DK-5
eyepiece cap
as
shown.
This
prevents light entering
via
...
the viewfinder interfering with exposure.
Self-timer
mode
ends when a photograph
is
taken or the camera
is
turned off. Single-frame
or continuous shooting mode
is
automatically restored when self-timer mode ends.
Reference:
More
on
Photography
(All
Modes)/Shooting
Mode
I
33