
Owner's Manual
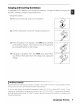


Table Of Contents
- Quick Start Guide
- Owners Manual
- Reset
- Reset Custom Settings (Custom Menu Item)
- Two-Button Reset (Does Not Affect Custom Settings)
- Clock Set (Setup Menu Item)
- Image Quality & Size
- Table of Contents
- Introduction
- Supplied Accessories
- Parts & Controls
- Getting Started
- Basic Operation
- Advanced Operation
- Using the Camera Menus
- Optional Accessories
- Maintenance
- Troubleshooting
- Error Messages & Displays
- Available Settings & Default Values
- Using the Command Dial
- Memory Capacity / Image Size
- Specs
- Index
- Scans of Software CD-ROMS
- Scans of Supplied DVDs
- 55-200mm Lens Information
- Warranty for Supplied Lenses
- Warranty Extension Offer for Supplied Lens
- Camera Warranty

2
Memory
cards must be formatted in
the
camera before first
use.
Note
that
formatting
memory
cards permanently deletes
all
photographs and other data
they
may contain.
Be
sure
all
data you wish
to
keep have been copied
to
another storage device before
formatting
the
card.
2.1
2.2
Position cursor
in
setup menu.
~
Highlight
11'.
Turn camera on. Display menus.*
* If
menu
item
is
highlighted,
press
multi selector left
to
highlight
icon for current menu.
2.3 2.4
2.5
~
Highlight Format memory card.
2.6
~
Display options.
Format card. Do not turn camera offor
remove card or battery until formatting
is
complete and setup menu
is
displayed.
2.7
~
Highlight
Yes.
2.8
~
Write-protect switch
Formatting
Memory
Cards
Use
the
camera Format memory card
option
to
format
memory
cards. Performance may
drop
if
cards
are
formatted in a computer.
The
Write
Protect
Switch
SD
cards
are
equipped
with
a write protect switch
to
prevent accidental
loss
of
data. When this switch
is
in
the
IIlock
li
position, the camera will dis-
playa
message
to
warn
that
photos can
not
be recorded or deleted and
the
memory
card can
not
be formatted.
Introduction:
First
Steps
I
13