
Owner's Manual
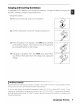


Table Of Contents
- Quick Start Guide
- Owners Manual
- Reset
- Reset Custom Settings (Custom Menu Item)
- Two-Button Reset (Does Not Affect Custom Settings)
- Clock Set (Setup Menu Item)
- Image Quality & Size
- Table of Contents
- Introduction
- Supplied Accessories
- Parts & Controls
- Getting Started
- Basic Operation
- Advanced Operation
- Using the Camera Menus
- Optional Accessories
- Maintenance
- Troubleshooting
- Error Messages & Displays
- Available Settings & Default Values
- Using the Command Dial
- Memory Capacity / Image Size
- Specs
- Index
- Scans of Software CD-ROMS
- Scans of Supplied DVDs
- 55-200mm Lens Information
- Warranty for Supplied Lenses
- Warranty Extension Offer for Supplied Lens
- Camera Warranty

Inserting
Memory
Cards
The camera stores pictures
on
Secure Digital
(SO)
memory
cards (available separately).
1 Insert a
memory
card.
1.1
Before inserting or removing
memory
cards, turn the cam-
era
off
and open
the
card slot cover.
1.2
Slide
the
memory
card in
as
shown
at
right
until
it
clicks
into
place. The
memory
card access
lamp
will
light
for
about
a second. Close
the
memory
card slot cover.
Front
Removing
Memory
Cards
1.
Confirm
that
the
access
lamp
is
off.
2.
Turn
the
camera
off
and open the
memory
card slot cover.
3.
Press
the
card in
to
eject
(CD).
The card can
then
be removed by hand
(~).
12
I
Introduction:
First
Steps