
Owner's Manual
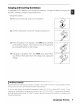


Table Of Contents
- Quick Start Guide
- Owners Manual
- Reset
- Reset Custom Settings (Custom Menu Item)
- Two-Button Reset (Does Not Affect Custom Settings)
- Clock Set (Setup Menu Item)
- Image Quality & Size
- Table of Contents
- Introduction
- Supplied Accessories
- Parts & Controls
- Getting Started
- Basic Operation
- Advanced Operation
- Using the Camera Menus
- Optional Accessories
- Maintenance
- Troubleshooting
- Error Messages & Displays
- Available Settings & Default Values
- Using the Command Dial
- Memory Capacity / Image Size
- Specs
- Index
- Scans of Software CD-ROMS
- Scans of Supplied DVDs
- 55-200mm Lens Information
- Warranty for Supplied Lenses
- Warranty Extension Offer for Supplied Lens
- Camera Warranty

Basic
Setup
The first
time
the
camera
is
turned
on,
the
language selection dialog
shown
in Step 1 will be
displayed in
the
monitor. Follow
the
steps
below
to
choose a language and set
the
time
and date. No
photographs
can be taken until
the
camera clock
has
been set.
1
2
~
Select language.
3
4
Display map
of
world time zones. * Select local
time
zone.
* UTe field shows
time
difference between selected
time
zone and Coordinated Universal Time
(UTC),
in hours.
5
Display daylight saving time options.
6
Highlight On
if
daylight saving time
is
in effect.
Press
multi selector left
or
right
to
select item,
up or
down
to
change.
To
reset the camera clock, choose a
new
time
zone, turn daylight saving
time
on or off, or
choose the order in which the
year,
month, and
date are displayed,
use
the
World
time
option
in
the setup menu (
83).
8
~
Display date menu.
9
7
Exit
to
shooting mode.
Using
Camera
Menus
The language
menu
is
only displayed automatically
the
first
time
the
camera
is
turned on.
See
the
Menu Guide
63)
for information on normal menu operation.
Introduction:
First
Steps
[11