
Owner's Manual
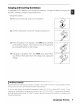


Table Of Contents
- Quick Start Guide
- Owners Manual
- Reset
- Reset Custom Settings (Custom Menu Item)
- Two-Button Reset (Does Not Affect Custom Settings)
- Clock Set (Setup Menu Item)
- Image Quality & Size
- Table of Contents
- Introduction
- Supplied Accessories
- Parts & Controls
- Getting Started
- Basic Operation
- Advanced Operation
- Using the Camera Menus
- Optional Accessories
- Maintenance
- Troubleshooting
- Error Messages & Displays
- Available Settings & Default Values
- Using the Command Dial
- Memory Capacity / Image Size
- Specs
- Index
- Scans of Software CD-ROMS
- Scans of Supplied DVDs
- 55-200mm Lens Information
- Warranty for Supplied Lenses
- Warranty Extension Offer for Supplied Lens
- Camera Warranty

2 Insert
the
battery.
2.1
After confirming that the power switch
is
in the
off
posi- =
tion, open the battery chamber cover.
2.2
Insert a fully charged battery
as
shown at right. Close the
battery chamber cover.
Removing
the
Battery
Turn the camera
off
before removing the battery.
To
avoid shorting the battery, replace the terminal
cover
when
the
battery
is
not
in
use.
10
I
Introduction:
First
Steps