
Owner's Manual
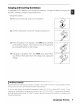


Table Of Contents
- Quick Start Guide
- Owners Manual
- Reset
- Reset Custom Settings (Custom Menu Item)
- Two-Button Reset (Does Not Affect Custom Settings)
- Clock Set (Setup Menu Item)
- Image Quality & Size
- Table of Contents
- Introduction
- Supplied Accessories
- Parts & Controls
- Getting Started
- Basic Operation
- Advanced Operation
- Using the Camera Menus
- Optional Accessories
- Maintenance
- Troubleshooting
- Error Messages & Displays
- Available Settings & Default Values
- Using the Command Dial
- Memory Capacity / Image Size
- Specs
- Index
- Scans of Software CD-ROMS
- Scans of Supplied DVDs
- 55-200mm Lens Information
- Warranty for Supplied Lenses
- Warranty Extension Offer for Supplied Lens
- Camera Warranty

Charging and Inserting
the
Battery
The supplied
EN-EL9
battery
is
not
charged at shipment. Charge the battery using the sup-
plied MH-23 battery charger
as
described below.
1 Charge
the
battery.
1.1
Remove
the
terminal cover from
the
battery.
1.2
Connect
the
power cord
to
the charger and plug it in.
1.3
Place
the
battery
in
the charger. The
CHARGE
lamp will blink
as
the
battery charges.
About
90
minutes
are
required for
an
exhausted battery
to
fully charge.
1.4
Charging
is
complete when
the
CHARGE
lamp stops blink-
ing. Remove the battery from
the
charger and unplug
the
charger.
The
Battery
and
Charger
Read
and follow
the
warnings and cautions
on
pages
ii-iii and 706-707
of
this
manual, together with any
warnings and instructions provided
by
the
battery manufacturer.
Do
not
use
the
battery at
ambient
temperatures
below
ooe (32°F) or above 40
0
e (104
OF).
During
charging,
the
temperature
should be in
the
vicinity
of
5-35
°e (41-95
OF).
For
best results, charge
the
battery at temperatures above
20
0
e (68°F). Battery capacity may
drop
if
the
battery
is
charged or used
at lower temperatures.
Introduction:
First
Steps
I
9