
Owner's Manual
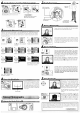

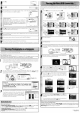


Table Of Contents
- Quick Start Guide
- Owners Manual
- Reset
- Reset Custom Settings (Custom Menu Item)
- Two-Button Reset (Does Not Affect Custom Settings)
- Clock Set (Setup Menu Item)
- Image Quality & Size
- Table of Contents
- Introduction
- Supplied Accessories
- Parts & Controls
- Getting Started
- Basic Operation
- Advanced Operation
- Using the Camera Menus
- Optional Accessories
- Maintenance
- Troubleshooting
- Error Messages & Displays
- Available Settings & Default Values
- Using the Command Dial
- Memory Capacity / Image Size
- Specs
- Index
- Scans of Software CD-ROMS
- Scans of Supplied DVDs
- 55-200mm Lens Information
- Warranty for Supplied Lenses
- Warranty Extension Offer for Supplied Lens
- Camera Warranty

Make
selection
and
exit.
Press
multi selector
down to highlight
press
G to
select.
HighlightPTP
To
start printing, highlight Start Printing
and
press
G.
The
PictBridge playback display will
be
displayed
when printing
is
complete.
To
cancel
and
return
to the
PictBridge
playback
display
before
all
images
have
been
printed~
press
the G button.
Display
USB
options.
To
print the picture currently
selected
in
the
PictBridge
playback
display,
press
G.
The
menu shown
at
right will
be
displayed.
Press
the multi selector
up
or
down to highlight
an
option
and
press
to the right to
select.
Printed in Thailand
6MBA7811-01
Turn
the
camera
off.
Connect the supplied
USB
cable
as
shown.
Do
not
use
force
or
attempt to insert the connectors
at
an
angle.
Connect the
camera
directly to the printer; do not connect the
cable
via
a
USB
hub
or
keyboard.
Turn
the printer
on.
Press
e button.
Menus
displayed
in
monitor.*
*If
setup
menu
is
displayed,
proceed
to
@.
Press
the multi selector left or right to view additional photo-
g
ra
phs,
or
press
the 8 button to zoom
in
on
the
cu
rrent
photo.
To
view
six
photographs
at
atime,
press
the ebutton.
Use
the
multi selector to highlight photographs,
or
press
8 to
display
the highlighted photograph full
frame.
Turn
the
camera
on.
A welcome
screen
will
be
displayed,
fol-
lowed
by
the
PictBridge
playback
display.
Windows 2000andPictBridge Printers
The
camera
USB
option must
be
set
to Mass Storage (the default option} before connecting to
a Windows 2000 computer. If
you
have
selected PTP to connect to a PictBridge printer, reselect
Mass Storage before connecting to a computer.
JPEG
photographs
can
be
printed directly from a
camera
connected to a PictBridge printer
(RAW
/NEF
photographs
can
not
be
printed
by
direct
USB
connection).
See
page
57
of
Guide
to
Digital
Photography
for details.
Set
the
USB
option
in
the
camera
setup menu to
PTP
WI"Ido¥nCMperfoonrhesameach:lneachtineyoume.t
adsk.()(corneda~~ttiski1dolfie;
:yPicl"'e1
\I;'MI
doyouWMtWnOOwt.lO
do?
I
~
~~;~"~~~~:'-:17"1.
.•
~!
(GIlilmNh "i') }
(~:2L~
Thls-lnstaUer
package
ne.tds
to
run
a
program
to
determlne
Irft
can be
Installed.
Do
you
want
tocontinuel
~
..1~;;;E~::r-Transfer
button
Apple QuickTime
If
an
earlier version
of
QuickTime
is
installed, the
QuickTime installer will start. Follow the on-screen in-
structions to complete installation.
On
some
systems,
the QuickTime instaUermay require considerable time to
complete installation.
WindowsXP
The
dialog shown
at
right will
be
displayed when the
camera
is
turned
on.. Select
Copy pictures
to
a folder on
my
computer
using
PictureProject
and
click OK.
To
bypass
this dialog
in
future, check
Always
do
the
selected action.
Click
Yes.
Click
Quit.
Click
OK.
If a dialog
is
displayed
directing
you
to
restart
the com-
puter,
follow the
on-screen
instructions.
The
PictureProject Import
Assistant
will
be
displayed
(see
step
12
of
Installing PictureProject
(Windows)
for
details).
The
PictureProject
In
Touch
Updater installer will
start.
Follow the
on-screen
instructions to complete installation.
Ifthe computer
restarts,
log
in
to the account
used
to
install
PictureProject.
Remove
the PictureProject installer
CD
from the
CD-ROM
drive.
This
completes installation
of
PictureProject.
Proceed
to "Viewing Photographs
on
a
Computer."
The
photographs will
be
displayed
in
PictureProject when transfer
is
complete.
PictureProject periodically
checks
for updates when the
computer
is
connected to the Internet. If
an
update
is
detected when PictureProject
starts,
an
update dialog will
be
displayed.
Follow the
on-screen
instructions to update
to the latestversion
of
PictureProject.
Turn
the
camera
off
and
connect the supplied
UC-E4
USB
cable
as
shown below.
Do
not
use
force
or attempt to insert the connectors
at
an
angle.
Connect the
camera
directly to the computer; do
not connect the
cable
via
a
USB
hub
or
keyboard.
Turn
the camera on. PictureProject will automatically detect the camera and the
PictureProject
Transfer
window will
be
displayed
in
the computer monitor.
Click
Transferto copy
all
photographs from the
camera
memory
card
to the computer.
Disconnecting
the
Camera
Before
turning the
camera
off
and
disconnecting the
USB
cable,
remove the
camera
from the
sys-
tem
as
described below.
•
Windows
XP
Home
Edition/Professional:
Click
the
"Safely
Remove
Hardware" icon
inthe
taskbar
and
select Safely remove
USB
Mass Storage Device from the menu that
appears.
'.
Windows
2000
Professional:
Click
the "Unplug or
Eject
Hardware"
(_
icon
in
the taskbar
an~
select
Stop
USB
Mass Storage Device from the menu that
appears.
•
Macintosh:
Drag
the
camera
volume
("NIKON
040") into the
Trash.
Use
a Reliable Power
Source
~ikon
recommends
using
an
optional
EH-5
AC
adapter
and
EP-5
AC
adapter connector to power
thecamera for extended
perloas-.-
T)o'h6-i
use
another
make
or
moderof
AC"'adapter.
The
illustrations
in
this section
are
from Windows
XP.
3
2
1