
Owner's Manual
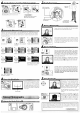

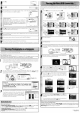


Table Of Contents
- Quick Start Guide
- Owners Manual
- Reset
- Reset Custom Settings (Custom Menu Item)
- Two-Button Reset (Does Not Affect Custom Settings)
- Clock Set (Setup Menu Item)
- Image Quality & Size
- Table of Contents
- Introduction
- Supplied Accessories
- Parts & Controls
- Getting Started
- Basic Operation
- Advanced Operation
- Using the Camera Menus
- Optional Accessories
- Maintenance
- Troubleshooting
- Error Messages & Displays
- Available Settings & Default Values
- Using the Command Dial
- Memory Capacity / Image Size
- Specs
- Index
- Scans of Software CD-ROMS
- Scans of Supplied DVDs
- 55-200mm Lens Information
- Warranty for Supplied Lenses
- Warranty Extension Offer for Supplied Lens
- Camera Warranty

~
(~)
Ucense
Welcome to the PictureProject In
Touch Downloader 1.0 Setup Wizard
-----
--------(~li~ii
YouMveent",edthelolowi-lgfoldeJ~lCSm
C:\P1ogAmFkIWll:cn\PichlePto;ect
__________
...
~~~E!~1!~~l!':
...
_~
_
WelcomelotheworldofNikonDigitaipholographyo
Please
se!ectalanguagefromthechoices
below.
(langUage:fEngii,h--------
Cal ure
°rlal
CalU"
ler
,10'
ust,
A1tlhenllcale
---------------------~----"'"-...,-'-',--~------------
I
""'
~_
..
"'ID"'
..
k.""'j.""~.f
..
e
..
(
..
wh.e.nyo.-u.-
IJiiI conneet
your
dtgltaJ camera ?
C--No-;
€$f%~Y~~~f0}
~1.7
Close
button
"Import from"
folder
Capture
NX
Free
Trial:
Click
Capture
NX
Free Trial
in
the
Install
Center window to open your
web browser to a
site
where you
can
download a trial
version
of
Capture
NX
(Internet con-
nection required).
Capture
NX
Updater:
Update existing versions
of
Capture
NX
(available
separately).
DirectX9
If DirectX 9
is
not already installed,
the dialog shown at right will be
displayed. Follow the on-screen.in-
structions to install DirectX
9.
Click
Yes.
Click
Install.
Read
the
license
agreement. ..
'~;:~;:":~:~
...
and
click
Accept to accept
and
view the
ReadMe
file.
Take
a
Il~ig§~~~~S~~~~}EE~~~~~~[f~rij~~~~;O(111
few moments to
read
this
file,
which
may
contain important in-
formation that could not
be
included
in
this guide.
Click
Con-
tinue
...
to proceed with installation.
.
..
and
click
OK.
Click
Yes.
Click
Finish.
Click
Yes.
Click
Yes.
If a dialog
is
displayed directing you to restart the
computer, follow the on-screen instructions.
Alanguage-selection dialog will
be
displayed.
Select
alanguage
and
click
Next.
Click
Easy
Install to begin installation
of:
• PictureProject
• PictureProject
In
Touch
•
Camera
Control
Pro
Updater
• Apple
QuickTime
Enter
the administrator
name
and
password
...
The
PictureProject
In
Touch
installer will
start.
Click
Next
and
fol-
low the on-screen instructions to complete installation.
Remove
the PictureProject installer
CD
from the
CD-ROM
drive.
This
completes installation
of
PictureProject.
Proceed
to "Viewing Photographs
on
aComputer."
The
PictureProject Import
Assistant
will
be
displayed.
The
Import
Assistant
is
used
to catalog
existing
images
for
display
in
PictureProject.
1
Click
Import
to catalog the
images
in
the "Import from" folder
in
PictureProject.
The
time
needed to catalog the
images
is
proportional to the number
of
images
in
the folder.
2
Click
OK
to
close
the Import
Assistant
when import
is
complete.
To
proceed without cataloging existing
images,
click
Close.
Existing
images
can
be
cataloged
manually
at
any
time;
see
the
PictureProject
Reference
Manual
(on
CD)
for
details.
Instal!I!i!ng,eiFttUirhe!er.Qj~eiJ~t;'itJ_(~,MI·
!laE!-
.tF~i!J!n~t~,p~·1i;lS~tbJ!!
,,~~
•••••••••••••
_
The
illustrations
in
this section
are
intended
as
a guide only.
The
dialogs and
messages
displayed dur-
ing installation
may
differ
in
some respects from those shown
here.
Turn
the computer
on
and
insert the PictureProject installer
CD
into the
CD-ROM
drive.
Double-
click
the PictureProject installer
CD
icon
on
the
desktop,
then double-click the Welcome
icon.
C~~~~~ii!=-)
C~l~~~~~)
~~~=---"
C-=-
__
~~=-d
C
...
~J.!i&fi~I~D
WJl.7
---~@~-
Choose
DeliinalionLocalion
Select
folder
I'k.ere
seh",
IHi
nslalUes
LtcenseAgreeDehl
~3sereadthelolown'JKemeageel',.,erl:careflAol
- -- -~
..
-- --- . - - - -- - -- - -
-.
- --- -
S~WIIri$!alPictl.leProtec(i1thelofoy,V;gtoidef
Retouch photos using a variety
of
tools, including
cropping and brightness and hue adjustment.
Before
connecting
the
camera,
be
sure
that
PictureProject
is
installed.
If
the
Windows hardware wizard
is
displayed when
the
camera
is
connected, click Cancel
to
exit
the
wizard.
Log on
to
an
account
with
administrator privileges when installing,
using,
or
uninstalling PictureProject.
Turn
off
any virus-protection software and exit
all
other applications
before beginning installation.
View the photos· in the current collection or
folder.
Arrange photos
ill
a·
variety
of
............................................................................................................................................................................
,ayouts.
If
the
"Select
Language"Dialog
Is
Not Displayed
Open
liMy
Computer" by selecting·
My
Computer from the Start menu (Windows
XP)
or by double-clicking the
My
Computer icon on the desktop (Windows
2000)
and then
double-click the
CD
(PictureProject) icon.
Follow the on-screen instructions to
install
the
drivers
for Dl-series
cameras.
Click
Yes.
..
.
and
click
Yes
to accept
and
proceed with installation.
Read
the
license
agreement.
..
Click
Easy Install to begin installation
of:
•
Drivers
for Dl-series
cameras
Apple QuickTime
PictureProject
• PictureProject
In
Touch
•
Camera
Control
Pro
Updater
• Microsoft DirectX 9
ee'(
:
Click
Capture NX Free Trial
in
the Install Center window to open your
b brow
rto
a site where you
can
download
a trial version
of
Capture
NX
(Internet con-
nection required).
Capture
NX
Updater:
Update existing versions
of
Capture
NX
(avaUable
separately).
Click
Next
to install PictureProject to the location shown, or click
Browse
...
to choose a different folder.
Group photos into collections
and collections
into
folders.
View and organize photographs.
Other
tasks
that
can
be
performed with PictureProject include printing photographs, sending
photos bye-mail, viewing slide
shows,
and
copying photographs to
CD
or
DVD.
This
section describes how to install PictureProject and copy photographs to a computer.
PictureProject
can
also
be
used
to
view,
edit,
and
organize photographs.
See
the
PictureProject
Reference
Manual
(on
CD)
for more information.
Vie~ingthePicturePr~ectRe~rence~anual
~~~~~~~~~~~~~~~~~~
1 Start the
computer
and insert
the
silver reference
CD.
2 Double-click
the
CD
icon.
•
Windows:
Double-click the
CD
(Nikon) icon in My Computer.
•
Macintosh:
Double-click the
CD
(Nikon) icon on the desktop.
3 Double-click
the
INDEX
or
INDEX.pdf
icon
to
display a language selection screen. Click a language
to
display
an
index
of
the documentation available for PictureProject and click a title
to
view.
Inst~lling
The
illustrations
in
this section
are
intended
as
a gUide
only.
The
dialogs
and
messages
displayed dur-
ing installation
may
differ
in
some respects from those shown
here.
Turn
the computer on
and
insert the PictureProject installer
CD
into the
CD-ROM
drive.
The
Install
Center
program will launch automatically. A language-selection dialog will
be
displayed.
Select
a language
and
click Next.