
Owner's Manual
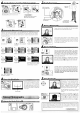

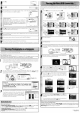


Table Of Contents
- Quick Start Guide
- Owners Manual
- Reset
- Reset Custom Settings (Custom Menu Item)
- Two-Button Reset (Does Not Affect Custom Settings)
- Clock Set (Setup Menu Item)
- Image Quality & Size
- Table of Contents
- Introduction
- Supplied Accessories
- Parts & Controls
- Getting Started
- Basic Operation
- Advanced Operation
- Using the Camera Menus
- Optional Accessories
- Maintenance
- Troubleshooting
- Error Messages & Displays
- Available Settings & Default Values
- Using the Command Dial
- Memory Capacity / Image Size
- Specs
- Index
- Scans of Software CD-ROMS
- Scans of Supplied DVDs
- 55-200mm Lens Information
- Warranty for Supplied Lenses
- Warranty Extension Offer for Supplied Lens
- Camera Warranty

Keepyour{
elbows in
Smoothly
press
the shutter-release
button
the
rest
of
the way
down
to
release
the shutter and record the
photograph. The
memory
card
access
lamp will light.
Do
not
eject the memory card orrefYIoveordisconnect
the power source
until
the lamp
has.goneoutand
recording
is
complete.
Use
the zoom ring
to
zoom
in
on the subject
so
that it
fills a larger
area
of
the frame, or zoom
out
to
increase the
area
visible
in
the photograph (select longer focal lengths
on the lens focal length
scale
index
to
zoom
in,
shorter
focal lengths
to
zoom out).
Frame a
photo
in
the viewfinder
with
the main subject
positioned in any
of
the three focus
areas.
Photographs
are
automatically displayed
after shooting. If no photograph
is
dis-
played in the monitor, the most recent
picture
can
be viewed by pressing the G
button. Additional pictures can be dis-
played by rotating the command dial or
pressing the multi selector left or right.
To
end playback and return
to
shooting
mode,
press
the shutter-release
button
halfway.
To
delete the photograph currently dis-
played
in
the monitor,
press
the 8 button.
A confirmation dialog will be displayed.
Press
the 8
button
again
to
delete the im-
age and return
to
playback.
To
exit
with-
out
deleting the picture,
press
the
~
but-
ton.
Stand with one
foot halfa pace in
-----..;
front
of
the other
Press
the shutter-release
button
halfway. The camera
will automatically select the focus
area
containing
the
subject closest
to
the
camera and focus on·this·subject.
If
the
subject
is
dark, the
AF-assist
illuminator may light
to
assist
the
focus operation and the flash may
popup.
The
monitor
will turn off. .
When the focus operation
is
complete, ·the selected
focus
area
will be highlighted,a beep will sound, and
the
in-focus indicator
(e)
will appear in
the
viewfinder.
t
Support the lens with
your left hand
For
more information on taking photographs and other camera operations,
see
the
Guide
to
Digital
Photography.
See
the other side
of
this guide for information on
using the supplied PictureProject software to copy photographs to a computer, and
printing photographs
via
direct
USB
connection. .
Hold the hand-grip
with your right hand
2
Highlight Format.
Format card. Do
not
turn camera
off
or remove card or battery
until formatting
is
complete.
Slide the diopter adjustment control
up and
down
until the focus brackets
are
in sharp focus. When operating
the diopter adjustment control
with
your eye
to
the viewfinder, be careful
not
to
put
your fingers or fingernails
in
your
eye.
®
Focus
brackets
Highlight
Yes.
Position cursor in setup menu.
Press
ebutton.
Menus displayed Highlight icon for current menu.
in monitor.
Slide the memory card in
as
shown
above until
it
clicks into place.
Before inserting or removing memory
cards,
turn
the camera
off
and open the card slot cover.
Memory
cards
must be formatted
in
the D40 before first
use.
Note that formatting
memory
cards
permanently deletes
all
photographs and other data they may contain.
Be
sure
all
data you wish
to
keep have been copied
to
another storage device before
formatting the card.
Highlight
1r
.
Turncamera on.
Display options.
CD
Setup menu displayed when
.formatting
is
complete.