
Owner's Manual


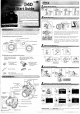
Table Of Contents
- Quick Start Guide
- Owners Manual
- Reset
- Reset Custom Settings (Custom Menu Item)
- Two-Button Reset (Does Not Affect Custom Settings)
- Clock Set (Setup Menu Item)
- Image Quality & Size
- Table of Contents
- Introduction
- Supplied Accessories
- Parts & Controls
- Getting Started
- Basic Operation
- Advanced Operation
- Using the Camera Menus
- Optional Accessories
- Maintenance
- Troubleshooting
- Error Messages & Displays
- Available Settings & Default Values
- Using the Command Dial
- Memory Capacity / Image Size
- Specs
- Index
- Scans of Software CD-ROMS
- Scans of Supplied DVDs
- 55-200mm Lens Information
- Warranty for Supplied Lenses
- Warranty Extension Offer for Supplied Lens
- Camera Warranty

Keeping
the mounting index
on
the
lens
aligned with the
mounting index
on
the
camera
body, position the
lens
in
the
camera's
bayonet mount
and
rotate the
lens
in
the
direction shown until it
clicks
into
place.
Ifthe
lens
is
equipped with
an
A-M
or M/A-M switch, select
A (autofocus) or
MIA (autofocus with
manual
priority).
Autofocus
is
available with
AF-S
lenses.
The
lens
kit option
includes
an
AF-S
lens;
for information
on
other
lenses
that
can
be
used
with the 040,
see
the
Guide
to
Digital
Photography.
Care
should
be
taken
to prevent dust from entering the
camera
when the
lens
or body
cap
is
removed.
o DK-16
viewfinder
eyepiece
o Accessory shoe cover
Confirm
that
the
package
contains
the
items
listed
below.
Purchasers
of
the
lens
kit
option
should
confirm that the
package
also
includes
a
lens.
Memory
cards
are
not
provided;
please
use
one
of
the
Secure
Digital
(SD)
memory
cards
listed
on
page
102
ofthe
Guide
to
Digital
Photography.
S~?eS
blinking
Charging complete
@
@
~
.•
·r·
~.·i
Set
clock and return
to
shooting
mode. Monitor will turn
off
au-
tomatically.
Display map of· world time
zones.
Charging
®
Select language.
Display daylight saving time
options. Highlight
On
if
daylight
saving
time
is
in effect.
Resetting
the
clock:
Use
the World time option
in
the setup menu to change the
camera
clock.
See
the
Guide
to
Digital
Photography
for
details.
A language-select'ion dialog will
be
displayed the first time the
camera
is
turned
on.
Follow the
steps
below to choose a language
and
set
the
camera
clock.
CD
@ @
~
~I
Turn camera on. Language-
selection dialog displayed.
Select local time zone.
o Strap
o MH-23
Quick
Charger
(with
power
cord*)
*
Shape
ofcord
depends
on
country of
sale.
o PictureProject installer
CD
(gray)
o PictureProject reference
CD
(silver)
o Registration Card
Battery-chamber cover
Lens
mounting
inde.l<
Focal
length
scale
Zoom ring
~ilr.,-=-==~~~,-=,~~
Memory card slot cover
~~~--~
Memory card
access
lamp
.
~"""d--_
Battery-chaml::5er cover latch
AF-assist illuminator
~-~~~
Diopter adjustment
control
Multi selector
Command dial
Viewfinder eyepiece
cup
----
Eyelet for camera strap
Built-in flash
Mode dial
Shutter-release
button
Power switch
o
DK-S
eyepiece cap
(for use
with
self-timer; clips
to
strap)
\
o
UC-E4
USB
cable
o EN-EL9 rechargeable
Li-ion
battery
(with
terminal
cover)
o Quick Start
Guide
(this
guide)
o
Guide
to Digital Photography
o
Warranty
G(playback
zoom)
button
Viewfinder
eyepiece