
Owner's Manual
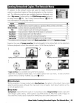


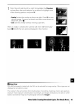


Table Of Contents
- Quick Start Guide
- Owners Manual
- Reset
- Reset Custom Settings (Custom Menu Item)
- Two-Button Reset (Does Not Affect Custom Settings)
- Clock Set (Setup Menu Item)
- Image Quality & Size
- Table of Contents
- Introduction
- Supplied Accessories
- Parts & Controls
- Getting Started
- Basic Operation
- Advanced Operation
- Using the Camera Menus
- Optional Accessories
- Maintenance
- Troubleshooting
- Error Messages & Displays
- Available Settings & Default Values
- Using the Command Dial
- Memory Capacity / Image Size
- Specs
- Index
- Scans of Software CD-ROMS
- Scans of Supplied DVDs
- 55-200mm Lens Information
- Warranty for Supplied Lenses
- Warranty Extension Offer for Supplied Lens
- Camera Warranty

7
Press
the
multi selector left or right
to
highlight
the Preview
column.
Press
the
multi selector up or
down
to
highlight
one
of
the
following
options and
press
OK.
•
Overlay:
Preview the overlay
as
shown at right.
Press
OK
to
save
the
new
image.
To
return
to
Step 6 and select
new
photos or
adjust gain, press
G.
•
Save:
Save
the
overlay
without
viewing a preview.
After
an
overlay
is
created, the camera will enter full-frame play-
back (
50)
with
the
new
picture displayed
in
the
monitor.
D
Image
Overlay
Only
RAW
photographs created with the
040
can be selected for image overlay. Other images
are
not
displayed on
the
selection screen.
The overlay
has
the same
photo
info (including date
of
recording, metering, shutter speed, aperture,
exposure mode, exposure compensation, focal length, and image orientation) and values for white
balance and optimize image
as
the photograph selected for Image
1.
I
Menu
Guide/Creating
Retouched
Copies:
The
Retouch
Menu
I
9S