
Owner's Manual
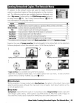


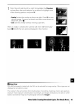


Table Of Contents
- Quick Start Guide
- Owners Manual
- Reset
- Reset Custom Settings (Custom Menu Item)
- Two-Button Reset (Does Not Affect Custom Settings)
- Clock Set (Setup Menu Item)
- Image Quality & Size
- Table of Contents
- Introduction
- Supplied Accessories
- Parts & Controls
- Getting Started
- Basic Operation
- Advanced Operation
- Using the Camera Menus
- Optional Accessories
- Maintenance
- Troubleshooting
- Error Messages & Displays
- Available Settings & Default Values
- Using the Command Dial
- Memory Capacity / Image Size
- Specs
- Index
- Scans of Software CD-ROMS
- Scans of Supplied DVDs
- 55-200mm Lens Information
- Warranty for Supplied Lenses
- Warranty Extension Offer for Supplied Lens
- Camera Warranty

Selecting Small picture from the retouch menu displays the menu shown in Step
1.
Fol-
low the steps below
to
create small copies
of
multiple pictures.
1
2
~
~
Highlight
Choose
size.
Display options.
3
4
~
~
Highlight
desired picture size. Make selection and return
to
previous menu.
S 6
~
~
Highlight
Select images. Display selection screen.
7
8
~
~
Select pictures (tyj 65). Selected pictures are Confirmation dialog displayed.
marked
with
~
icon.
9
10
~
~
Highlight
Yes.
* Copy
photos
and
exit
to
full-frame playback.
*
To
return
to
Step 7
without
creating copies
r
highlight
No and press
OK.
Press
MENU
to
exit
to
retouch
menu
without
creating copies.
I
m
Viewing
Small
Pictures
Small pictures are indicated by a gray border
during
full-frame playback. Playback
zoom
is
not
avail-
able
when
small pictures are displayed.
Menu
Guide/Creating
Retouched
Copies:
The
Retouch
Menu
I
93