
Owner's Manual
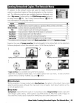


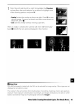


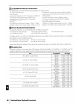
Table Of Contents
- Quick Start Guide
- Owners Manual
- Reset
- Reset Custom Settings (Custom Menu Item)
- Two-Button Reset (Does Not Affect Custom Settings)
- Clock Set (Setup Menu Item)
- Image Quality & Size
- Table of Contents
- Introduction
- Supplied Accessories
- Parts & Controls
- Getting Started
- Basic Operation
- Advanced Operation
- Using the Camera Menus
- Optional Accessories
- Maintenance
- Troubleshooting
- Error Messages & Displays
- Available Settings & Default Values
- Using the Command Dial
- Memory Capacity / Image Size
- Specs
- Index
- Scans of Software CD-ROMS
- Scans of Supplied DVDs
- 55-200mm Lens Information
- Warranty for Supplied Lenses
- Warranty Extension Offer for Supplied Lens
- Camera Warranty

Red-Eye Correction
Selecting this
option
displays a preview image
as
shown below. Confirm
the
effects
of
red-
eye correction and create a corrected copy
as
described in
the
following table. Note
that
red-eye correction may
not
always produce the expected results and may
in
very
rare
cir-
cumstances be applied
to
portions
of
the image
that
are
not
affected by red
eye;
check the
preview
thoroughly
before proceeding. Red-eye correction
is
available only
with
photo-
graphs taken using
the
flash.
To
Zoom in and
out
View
other
areas
of
image
Create copy
Use
Description
Press
0
to
zoom in,
0-:-
to
zoom out. While
photo
is
zoomed in,
press
multi selector
up, down, left, or right
to
view
areas
of
image
not
visible
in
monitor. Keep multi
selector pressed
to
scroll rapidly
to
other
areas
of
frame. Navigation
window
is
dis-
played while
GIG
buttons
or
multi selector
is
pressed;
area
currently
visible in
monitor
is
indicated by yellow border.
If the camera detects
red
eye
in
the
selected photograph, a copy will
be created
that
has
been processed
to
reduce its effects. No copy will
be created
if
the
camera
is
unable
to
detect
red
eye.
Trim
Choosing this
option
displays the selected image full frame
as
shown below.
To
create a
cropped copy
of
the
selected image:
To
Use
Zoom
in and
out
GIG
View
other
areas
~
of
image
Create copy
e
Description
Press
0
to
zoom in,
0-:.
to
zoom out. While
photo
is
zoomed in,
press
multi selector
up, down, left,
or
right
to
view
areas
of
image
not
visible
in
monitor.
Save
the
area
currently visible in
the
monitor
as
a separate file and
return
to
full-frame playback.
I
Pa
Trim:
Image
Quality
and
Size
Copies created from
NEF
(RAW)
or
NEF
(RAW)
+
JPEG
photos have
an
image quality
of
JPEG
Fine;
cropped copies created from
JPEG
photos have
the
same image quality
as
the
original. Depending on
the
size
of
the
crop, the copy may be 2,560x 1
,920,
1,920x1
,440,
1,280x960, 960x720, or 640x480
pixels in
size.
Menu
Guide/Creating
Retouched
Copies:
The
Retouch
Menu
I
91