
Owner's Manual
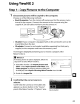


Table Of Contents
- Quick Start Guide
- Users Manual
- Reference Manual (Supplied on CD-ROM)
- Using This Manual
- Table of Contents
- Parts & Controls
- Getting Started
- Basic Photography
- Creative Photography (Scene Modes)
- More on Photography
- Shooting in P, S, A, & M Modes
- Live View - Framing Photographs in the Monitor
- Recording and Viewing Movies
- Shooting with Special Effects
- More on Playback
- Setup / Menus
- Connection to a Computer
- Printing Photographs
- Playback on a TV
- Compatible Lenses
- Optional Accessories
- Memory Card Compatibility
- Care / Maintenance
- List of Available Settings
- Troubleshooting
- Error Messages
- Specs
- Index
- Scans of CD-ROMs
- Warranty

3 Click Start Transfer.
At default settings, all
the
pictures on the
memory card will be copied
to
the computer.
4 Terminate
the
connection.
If
the
camera
is
connected
to
the
computer,
turn
the
camera
off
and disconnect
the
USB
cable.
If
you are using acard reader orcard slot, choose
the
appropriate
option in the computer operating system
to
eject the removable disk
corresponding
to
the
memory
card and then remove
the
card
from
the card
reader or card slot.
Step
2-View
Pictures
Pictures
are
displayed in ViewNX 2 when transfer
is
complete.
II
Starting ViewNX 2 Manually
• Windows: Double-click
the
ViewNX 2
shortcut on
the
desktop.
Mac
as:
Click
the
ViewNX 2 icon in
the
Dock.
II
Retouching
Photographs
To
crop pictures and perform such tasks
as
adjusting sharpness
and tone levels, click
the
Edit
button
in the ViewNX 2 toolbar.
II
Editing
Movies
To
perform such tasks
as
trimming
unwanted footage from
movies shot
with
the camera, click
the
Movie Editor
button
in
the ViewNX 2
tool
bar.
EI
••
Printing
Pidures
Click the Print
button
in
the
ViewNX 2 tool
bar.
A dialog will be
displayed, allowing you
to
print
pictures on a printer connected
to
the computer.
11."11
.~
,
',"
..
For More Information
Consult online help for more information on using
ViewNX
2.
64