
Owner's Manual
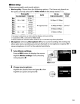


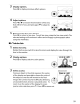

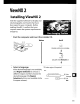
Table Of Contents
- Quick Start Guide
- Users Manual
- Reference Manual (Supplied on CD-ROM)
- Using This Manual
- Table of Contents
- Parts & Controls
- Getting Started
- Basic Photography
- Creative Photography (Scene Modes)
- More on Photography
- Shooting in P, S, A, & M Modes
- Live View - Framing Photographs in the Monitor
- Recording and Viewing Movies
- Shooting with Special Effects
- More on Playback
- Setup / Menus
- Connection to a Computer
- Printing Photographs
- Playback on a TV
- Compatible Lenses
- Optional Accessories
- Memory Card Compatibility
- Care / Maintenance
- List of Available Settings
- Troubleshooting
- Error Messages
- Specs
- Index
- Scans of CD-ROMs
- Warranty

ViewNX2
Installing ViewNX 2
Install
the
supplied
software
to
display and
edit
photographs
and
movies
that
have
been
copied
to
your
computer.
Before
installing ViewNX
2,
confirm
that
your
computer
meets
the
system
requirements
on
page
62.
1 Start
the
computer
and
insert
the
installer
CD.
Windows
MacOS
Welcome
Double-click Welcome icon
?:~:::~~t~;~Il:~~:~:h:~~t~~'II'~'
@
Select
I
.~-
-- - -
r-----
language
~,.~~"ciA
I
~"".0.~
I---~--·-
@
Click
Next
CD
Select region
(if
required)
Double-click icon on desktop
~
NlI«N1
.
'~
2 Select a language.
If
the
desired
language
is
not
available,
click
Region Selection
to
choose a
different
region
and
then
choose
the
desired
language
(the
Region
Selection
button
is
not
available in
the
European release).
61