
Owner's Manual

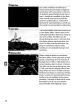

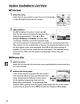

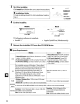
Table Of Contents
- Quick Start Guide
- Users Manual
- Reference Manual (Supplied on CD-ROM)
- Using This Manual
- Table of Contents
- Parts & Controls
- Getting Started
- Basic Photography
- Creative Photography (Scene Modes)
- More on Photography
- Shooting in P, S, A, & M Modes
- Live View - Framing Photographs in the Monitor
- Recording and Viewing Movies
- Shooting with Special Effects
- More on Playback
- Setup / Menus
- Connection to a Computer
- Printing Photographs
- Playback on a TV
- Compatible Lenses
- Optional Accessories
- Memory Card Compatibility
- Care / Maintenance
- List of Available Settings
- Troubleshooting
- Error Messages
- Specs
- Index
- Scans of CD-ROMs
- Warranty

3 Display options.
Press
®
to
display miniature effect options.
4 Adjust options.
Press
....
or
~
to
choose the orientation
of
the
a
rea
that
will be in focus and
press'"
or'"
to
adjust its
~OK
~
width.
~
~
S Return
to
the
live view display.
Press
®
to
return
to
live view.
To
exit live view, rotate
the
live view switch. The
selected settings will continue in effect and will apply
to
photographs taken
using the viewfinder.
II
~
Selective
Color
1 Select live view.
Rotate the live view switch
to
raise
the
mirror and display the view through the
lens in
the
monitor.
Selected color
@
3 Select a color.
Frame
an
object in the white square in
the
center
of
the
display and
press'"
to
choose the color
of
the
object
as
one
that
will remain in the final
image (the camera may have difficulty detecting
~
unsaturated colors; choose a saturated color).
To
~
zoom in on the center
of
the display for more
precise color selection,
press~.
Press
~~
to
zoom out.
~.
2 Display options.
Press
®
to
display selective color options.
59