
Owner's Manual


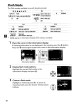
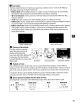
Table Of Contents
- Quick Start Guide
- Users Manual
- Reference Manual (Supplied on CD-ROM)
- Using This Manual
- Table of Contents
- Parts & Controls
- Getting Started
- Basic Photography
- Creative Photography (Scene Modes)
- More on Photography
- Shooting in P, S, A, & M Modes
- Live View - Framing Photographs in the Monitor
- Recording and Viewing Movies
- Shooting with Special Effects
- More on Playback
- Setup / Menus
- Connection to a Computer
- Printing Photographs
- Playback on a TV
- Compatible Lenses
- Optional Accessories
- Memory Card Compatibility
- Care / Maintenance
- List of Available Settings
- Troubleshooting
- Error Messages
- Specs
- Index
- Scans of CD-ROMs
- Warranty

Using.the Built-in
Flash
The camera supports a variety
of
flash modes for photographing poorly lit
or
backlit
subjects.
••
Using
the
Built-in
Flash:~,
2,
·S·,
~,
rt
~,
tW,
and
~
Modes
1 Choose a flash
mode
(CD
38).
2 Take pictures.
The flash will
pop
up
as
required when
the
shutter-release
button
is
pressed halfway, and
fire when a photograph
is
taken.
If
the flash does
not
pop
up automatically,
DO
NOT
attempt
to raise
it
by
hand. Failure to observe this precaution could
damage the flash.
••
Using
the
Built-in
Flash:
P,
S,
A,
M,
and
T'
Modes
1 Raise
the
flash.
Press
the
~
button
to
raise
the flash.
2 Choose a flash mode
(P,
S,
A,
and Mmodes
only;
CD
38).
3 Take pictures.
The flash will fire whenever a picture
is
taken.
~
button
• Lowering
the
Built-in Flash
To
save
power
when the flash
is
not
in
use,
press
it
gently
downward
until
the
latch clicks
into
place.
37