
Owner's Manual


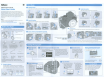
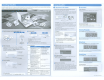
Table Of Contents
- Quick Start Guide
- Users Manual
- Reference Manual (Supplied on CD-ROM)
- Using This Manual
- Table of Contents
- Parts & Controls
- Getting Started
- Basic Photography
- Creative Photography (Scene Modes)
- More on Photography
- Shooting in P, S, A, & M Modes
- Live View - Framing Photographs in the Monitor
- Recording and Viewing Movies
- Shooting with Special Effects
- More on Playback
- Setup / Menus
- Connection to a Computer
- Printing Photographs
- Playback on a TV
- Compatible Lenses
- Optional Accessories
- Memory Card Compatibility
- Care / Maintenance
- List of Available Settings
- Troubleshooting
- Error Messages
- Specs
- Index
- Scans of CD-ROMs
- Warranty

Nikon
II
First
Steps
~
Recording
Movies
Viewing
and
Deleting
Photographs
Rotate
the
live view switch
CD
and press the
movie-record
button
®
to
start recording.
To
end recording, press the movie-record
button
again.
See
page
51
of
the
User's
Manual for more information.
To
view other pictures, press
the
multi
selector left or right.
Monitor
stowed on camera body
Monitor in storage position
o
Ready
the
monitor.
Open
the
monitor
as
shown. Do
not
use
force.
~
5.2
Smoothly
press
the
shutter-release
button
the
rest
of
the
way down
to
release
the
shutter and take a
photograph.
Ready
the
camera.
Remove
the
lens cap. Hold
the
handgrip in your right
hand and cradle the camera
body
or
lens
with
your left.
Autofocus
is
available
with
AF-S
lenses.
The lens kit option includes
an
AF-S
lens; for
information on
other
lenses
that
can
be used
with
the 05100,
see
page
65
of
the
User's
Manual.
~
D
Focus
and
shoot.
5.1
Press
the
shutter-release
button
halfway
to
focus.
A beep will sound and
the
in-focus indicator
(e)
will appear in the
viewfinder.
Choose
a
language
and
set
the
camera
clock.
2.1
Turn
the
camera on. A
2.2
Select a language and press
®.
language-selection dialog will
Use
the multi selector
to
select a
be displayed.
time
zone, choose a date format,
turn daylight saving
time
on
or
off,
and set
the
camera clock; press ®
after each step
to
proceed
to
the
next dialog.
o
Frame
a
photograph.
Frame a
[!]
photograph in
the
.
~
:R..~.:r)
C
..
,~L
viewfinder
with
~
J)~~'h
~
the main
subject'
)
in at least one
of
.
the
eleven focus
Focus
point
points.
For
information on focusing
the
viewfinder,
see
page
15
of
the
User's
Manual.
e
Insert
a
memory
card
(available
separately).
Check
to
be sure
the
card
is
in the correct orientation.
o
Attach
the
strap.
Attach the strap securely
to
the
two
eyelets on the camera body
as
shown below.
o
Insert
the
battery.
Check
to
be sure
the
battery
is
in the correct orientation.
~
DAN-DO
strap
4@
D Registration card
(U.s.A.
only)
D
DK-S
eyepiece cap
D
BF-1
B
body
cap
D
DK-20
rubber eyecup
D
BS-1
accessory shoe
cover
D
User's
Manual
D Reference
CD
D Warranty
D
UC-E6
USB
cable
~
D MH-24 battery charger
(plug
adapter
supplied
in
countries
or
regions
where
required;
shape
depends
on
country
of
sale)
~
DViewNX2CD
D Quick StartGuide
(this
guide)
D
EG-CP14
audio/
video cable
D
EN-EL14
rechargeable
Li-ion battery
(with
terminal
cover)
Digital Camera
05100
Quick
Start
Guide
Printed in Thailand
6MBl1811-01
Before
You
Begin
Purchasers
of
the lens kit
option
should confirm
that
the
package also includes a lens. Memory
cards
are sold
separately.
Plug into
outlet
~
_
@
~~~
Battery Charging
~~
.....
~
chargmg complete
I'l-"'~
~
~
This gUide provides first-time users
with
information on
taking photographs
with
the
05100
and on installing and
using the supplied software.
For
more information on taking
photographs,
see
the
User's
Manual; complete information on
using your Nikon digital camera can be found in the
Reference
Manual and in the help menu
of
the
supplied software
application.
Digitutor
"Digitutor': a series
of
"watch-and-learn" manuals in movie form,
is
available from
the
following website:
http://www.nikondigitutor.com/index_eng.html
[I]
Charge
the
battery.
If
a plug adapter
is
supplied, attach the plug adapter.
Insert
the
battery and plug
the
charger in. An exhausted
battery will fully charge in about
an
hour
and
30
minutes.
[I]
Unpack
the
camera.
Confirm
that
the
package contains
the
following items: