
Owner's Manual

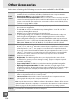


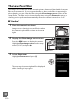
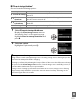


Table Of Contents
- Quick Start Guide
- Users Manual
- Reference Manual (Supplied on CD-ROM)
- Using This Manual
- Table of Contents
- Parts & Controls
- Getting Started
- Basic Photography
- Creative Photography (Scene Modes)
- More on Photography
- Shooting in P, S, A, & M Modes
- Live View - Framing Photographs in the Monitor
- Recording and Viewing Movies
- Shooting with Special Effects
- More on Playback
- Setup / Menus
- Connection to a Computer
- Printing Photographs
- Playback on a TV
- Compatible Lenses
- Optional Accessories
- Memory Card Compatibility
- Care / Maintenance
- List of Available Settings
- Troubleshooting
- Error Messages
- Specs
- Index
- Scans of CD-ROMs
- Warranty

208
n
Attaching a Power Connector and AC Adapter
Turn the camera off before attaching an optional power connector and AC adapter.
1 Ready the camera.
Open the battery-chamber (q) and power connector (w)
covers.
2 Insert the EP-5A power connector.
Be sure to insert the connector in the orientation shown,
using the connector to keep the orange battery latch
pressed to one side.
The latch locks the connector in place
when the connector is fully inserted.
3 Close the battery-chamber cover.
Position the power connector cable so that it passes
through the power connector slot and close the battery-
chamber cover.
4 Connect the AC adapter.
Connect the AC adapter power cable to the AC socket on AC adapter (e) and
the EP-5A power cable to the DC socket (r).
A P icon is displayed in the
monitor when the camera is powered by the AC adapter and power connector.
r
e