
Owner's Manual
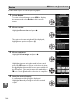
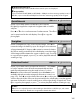


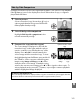

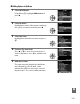
Table Of Contents
- Quick Start Guide
- Users Manual
- Reference Manual (Supplied on CD-ROM)
- Using This Manual
- Table of Contents
- Parts & Controls
- Getting Started
- Basic Photography
- Creative Photography (Scene Modes)
- More on Photography
- Shooting in P, S, A, & M Modes
- Live View - Framing Photographs in the Monitor
- Recording and Viewing Movies
- Shooting with Special Effects
- More on Playback
- Setup / Menus
- Connection to a Computer
- Printing Photographs
- Playback on a TV
- Compatible Lenses
- Optional Accessories
- Memory Card Compatibility
- Care / Maintenance
- List of Available Settings
- Troubleshooting
- Error Messages
- Specs
- Index
- Scans of CD-ROMs
- Warranty

190
u
5 Choose the color range.
Press 1 or 3 to increase or decrease the range of
similar hues that will be included in the final
photograph or movie.
Choose from values
between 1 and 7; note that higher values may
include hues from other colors.
The effect can be
previewed in the edit display.
6 Select additional colors.
To select additional colors, rotate the command
dial to highlight another of the three color boxes
at the top of the display and repeat Steps 3–5 to
select another color.
Repeat for a third color if
desired.
To deselect the highlighted color, press
O, or press and hold O to remove all colors.
7 Save the edited copy.
Press J to copy the photograph.