
Owner's Manual

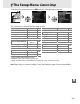


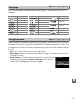
Table Of Contents
- Quick Start Guide
- Users Manual
- Reference Manual (Supplied on CD-ROM)
- Using This Manual
- Table of Contents
- Parts & Controls
- Getting Started
- Basic Photography
- Creative Photography (Scene Modes)
- More on Photography
- Shooting in P, S, A, & M Modes
- Live View - Framing Photographs in the Monitor
- Recording and Viewing Movies
- Shooting with Special Effects
- More on Playback
- Setup / Menus
- Connection to a Computer
- Printing Photographs
- Playback on a TV
- Compatible Lenses
- Optional Accessories
- Memory Card Compatibility
- Care / Maintenance
- List of Available Settings
- Troubleshooting
- Error Messages
- Specs
- Index
- Scans of CD-ROMs
- Warranty

167
g
B The Setup Menu: Camera Setup
To display the setup menu, press G and select the B (setup menu) tab.
The setup menu contains the following options:
1 Not available when battery is low.
2 Default varies with country of purchase.
3 Only available when compatible Eye-Fi memory card is inserted (0 175).
Note: Depending on camera settings, some items may be grayed out and unavailable.
G button
Option Default 0
Format memory card — 22
Monitor brightness 0 168
Info display format Graphic/black 168
Auto info display On 170
Clean image sensor
Clean at startup/shutdown
Clean at startup &
shutdown
210
Lock mirror up for cleaning
1
— 212
Video mode
2
— 170
HDMI
Output resolution Auto
148
Device control On
Flicker reduction
2
— 170
Time zone and date
2
Daylight saving time Off 170
Language
2
— 171
Image comment — 171
Auto image rotation On 172
Image Dust Off ref photo — 172
GPS
Auto meter-off Enable
174
Use GPS to set camera clock Ye s
Eye-Fi upload
3
Enable 175
Firmware version — 175
Option Default 0