
Owner's Manual


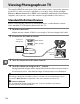


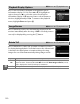


Table Of Contents
- Quick Start Guide
- Users Manual
- Reference Manual (Supplied on CD-ROM)
- Using This Manual
- Table of Contents
- Parts & Controls
- Getting Started
- Basic Photography
- Creative Photography (Scene Modes)
- More on Photography
- Shooting in P, S, A, & M Modes
- Live View - Framing Photographs in the Monitor
- Recording and Viewing Movies
- Shooting with Special Effects
- More on Playback
- Setup / Menus
- Connection to a Computer
- Printing Photographs
- Playback on a TV
- Compatible Lenses
- Optional Accessories
- Memory Card Compatibility
- Care / Maintenance
- List of Available Settings
- Troubleshooting
- Error Messages
- Specs
- Index
- Scans of CD-ROMs
- Warranty

147
Q
High-Definition Devices
The camera can be connected to HDMI devices using a type C mini-pin HDMI cable
(available separately from third-party suppliers).
1 Turn the camera off.
Always turn the camera off before connecting or disconnecting an HDMI cable.
2 Connect the HDMI cable as shown.
3 Tune the device to the HDMI channel.
4 Turn the camera on and press the K button.
During playback, images will be displayed on the high-definition television or
monitor screen; the camera monitor will remain off.
D Close the Connector Cover
Close the connector cover when the connectors are not in use.
Foreign matter in the
connectors can interfere with data transfer.
A Audio
When a movie with sound recorded in stereo using an optional ME-1 stereo microphone
(0 109, 207) is viewed on a television connected to the camera via an A/V cable, the audio
output is monaural.
HDMI connections support stereo output. Volume can be adjusted
using television controls; the camera controls can not be used.
Connect to high-definition device
(choose cable with connector for
HDMI device)
Connect to
camera