
Owner's Manual


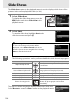


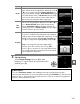

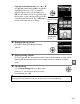
Table Of Contents
- Quick Start Guide
- Users Manual
- Reference Manual (Supplied on CD-ROM)
- Using This Manual
- Table of Contents
- Parts & Controls
- Getting Started
- Basic Photography
- Creative Photography (Scene Modes)
- More on Photography
- Shooting in P, S, A, & M Modes
- Live View - Framing Photographs in the Monitor
- Recording and Viewing Movies
- Shooting with Special Effects
- More on Playback
- Setup / Menus
- Connection to a Computer
- Printing Photographs
- Playback on a TV
- Compatible Lenses
- Optional Accessories
- Memory Card Compatibility
- Care / Maintenance
- List of Available Settings
- Troubleshooting
- Error Messages
- Specs
- Index
- Scans of CD-ROMs
- Warranty

140
Q
3 Turn the camera on.
A welcome screen will be displayed in the monitor, followed by a PictBridge
playback display.
Printing Pictures One at a Time
1 Select a picture.
Press 4 or 2 to view additional pictures, or press
1 or 3 to view photo information (0 124).
Press
the X button to zoom in on the current frame
(0 131; press K to exit zoom).
To view six
pictures at a time, press the W button.
Use the
multi selector to highlight pictures, or press X to
display the highlighted picture full frame.
2 Display printing options.
Press J to display PictBridge printing options.
3 Adjust printing options.
Press 1 or 3 to highlight an option and press 2 to select.
qw
Option Description
Page size
Menu of page sizes will be displayed (options not
supported by current printer are not listed).
Press 1 or
3 to choose page size (to print at default page size for
current printer, select Printer default), then press J to
select and return to previous menu.
No.
of
copies
Menu shown at right will be displayed.
Press 1 or 3 to
choose number of copies (maximum 99), then press J
to select and return to previous menu.