
Owner's Manual


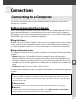

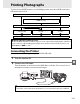

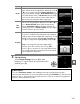

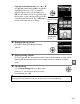
Table Of Contents
- Quick Start Guide
- Users Manual
- Reference Manual (Supplied on CD-ROM)
- Using This Manual
- Table of Contents
- Parts & Controls
- Getting Started
- Basic Photography
- Creative Photography (Scene Modes)
- More on Photography
- Shooting in P, S, A, & M Modes
- Live View - Framing Photographs in the Monitor
- Recording and Viewing Movies
- Shooting with Special Effects
- More on Playback
- Setup / Menus
- Connection to a Computer
- Printing Photographs
- Playback on a TV
- Compatible Lenses
- Optional Accessories
- Memory Card Compatibility
- Care / Maintenance
- List of Available Settings
- Troubleshooting
- Error Messages
- Specs
- Index
- Scans of CD-ROMs
- Warranty

139
Q
Printing Photographs
To print selected JPEG pictures on a PictBridge printer via a direct USB connection,
follow the steps below.
Connecting the Printer
Connect the camera using the supplied UC-E6 USB cable.
1 Turn the camera off.
2 Connect the USB cable.
Turn the printer on and connect the USB cable as shown.
Do not use force or
attempt to insert the connectors at an angle.
Take photographs
Select photographs for printing using DPOF print
order (0 144)
Connect camera to printer (see below)
Print photographs one at a
time (0 140)
Print multiple photographs
(0 142)
Create index prints
(0 142)
Disconnect USB cable
A Printing Via Direct USB Connection
Be sure the EN-EL14 battery is fully charged or use an optional EH-5b AC adapter and EP-5A
power connector.
When taking photographs to be printed via direct USB connection, set
Color space to sRGB (0 153).
D USB Hubs
Connect the camera directly to the printer; do not connect the cable via a USB hub.