
Owner's Manual


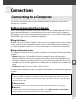


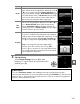

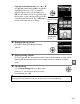
Table Of Contents
- Quick Start Guide
- Users Manual
- Reference Manual (Supplied on CD-ROM)
- Using This Manual
- Table of Contents
- Parts & Controls
- Getting Started
- Basic Photography
- Creative Photography (Scene Modes)
- More on Photography
- Shooting in P, S, A, & M Modes
- Live View - Framing Photographs in the Monitor
- Recording and Viewing Movies
- Shooting with Special Effects
- More on Playback
- Setup / Menus
- Connection to a Computer
- Printing Photographs
- Playback on a TV
- Compatible Lenses
- Optional Accessories
- Memory Card Compatibility
- Care / Maintenance
- List of Available Settings
- Troubleshooting
- Error Messages
- Specs
- Index
- Scans of CD-ROMs
- Warranty

138
Q
Connecting the Camera
Connect the camera using the supplied UC-E6 USB cable.
1 Turn the camera off.
2 Turn the computer on.
Turn the computer on and wait for it to start up.
3 Connect the USB cable.
Connect the USB cable as shown.
Do not use force or attempt to insert the
connectors at an angle.
4 Turn the camera on.
5 Transfer photographs.
After following the on-screen instructions to
start Nikon Transfer 2, click Start Transfer to
transfer photographs (for more information
on using Nikon Transfer 2, start ViewNX 2 or
Nikon Transfer 2 and select ViewNX 2 Help
from the Help menu).
6 Turn the camera off and disconnect the USB cable when transfer ends.
Nikon Transfer 2 will close automatically when transfer is complete.
D USB Hubs
Connect the camera directly to the computer; do not connect the cable via a USB hub
or keyboard.
A Camera Control Pro 2
Camera Control Pro 2 (available separately; 0 206) can be used to control the camera from a
computer.
When Camera Control Pro 2 is used to capture photographs directly to the
computer, a capture mode indicator will be displayed in the viewfinder and information
display.
Start Transfer