
Owner's Manual

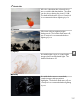

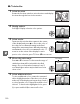


Table Of Contents
- Quick Start Guide
- Users Manual
- Reference Manual (Supplied on CD-ROM)
- Using This Manual
- Table of Contents
- Parts & Controls
- Getting Started
- Basic Photography
- Creative Photography (Scene Modes)
- More on Photography
- Shooting in P, S, A, & M Modes
- Live View - Framing Photographs in the Monitor
- Recording and Viewing Movies
- Shooting with Special Effects
- More on Playback
- Setup / Menus
- Connection to a Computer
- Printing Photographs
- Playback on a TV
- Compatible Lenses
- Optional Accessories
- Memory Card Compatibility
- Care / Maintenance
- List of Available Settings
- Troubleshooting
- Error Messages
- Specs
- Index
- Scans of CD-ROMs
- Warranty

120
%
❚❚ 3 Selective Color
1 Select live view.
Rotate the live view switch to raise the mirror and display
the view through the lens in the monitor.
2 Display options.
Press J to display selective color options.
3 Select a color.
Frame an object in the white square in the center
of the display and press 1 to choose the color of
the object as one that will remain in the final
image (the camera may have difficulty detecting
unsaturated colors; choose a saturated color).
To
zoom in on the center of the display for more
precise color selection, press X.
Press W to zoom out.
4 Choose the color range.
Press 1 or 3 to increase or decrease the range of
similar hues that will be included in the final
image.
Choose from values between 1 and 7;
note that higher values may include hues from
other colors.
5 Select additional colors.
To select additional colors, rotate the command
dial to highlight another of the three color boxes
at the top of the display and repeat Steps 3 and 4
to select another color.
Repeat for a third color if
desired.
To deselect the highlighted color, press
O, or press and hold O to remove all colors.
Live view switch
Selected color
Color range