
Owner's Manual

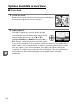

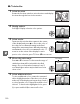


Table Of Contents
- Quick Start Guide
- Users Manual
- Reference Manual (Supplied on CD-ROM)
- Using This Manual
- Table of Contents
- Parts & Controls
- Getting Started
- Basic Photography
- Creative Photography (Scene Modes)
- More on Photography
- Shooting in P, S, A, & M Modes
- Live View - Framing Photographs in the Monitor
- Recording and Viewing Movies
- Shooting with Special Effects
- More on Playback
- Setup / Menus
- Connection to a Computer
- Printing Photographs
- Playback on a TV
- Compatible Lenses
- Optional Accessories
- Memory Card Compatibility
- Care / Maintenance
- List of Available Settings
- Troubleshooting
- Error Messages
- Specs
- Index
- Scans of CD-ROMs
- Warranty

118
%
Options Available in Live View
❚❚ g Color Sketch
1 Select live view.
Rotate the live view switch to raise the mirror and display
the view through the lens in the monitor.
2 Adjust options.
Press J to display the options shown at right
(note that the options temporarily clear from the
display during autofocus).
Press 1 or 3 to
highlight Vividness or Outlines and press 4 or
2 to change.
Vividness can be increased to make
colors more saturated, or decreased for a washed-out, monochromatic effect,
while outlines can be made thicker or thinner.
Increasing the thickness of the
lines also makes colors more saturated.
Press J to exit when settings are
complete.
To exit live view, rotate the live view switch.
The selected settings
will continue in effect and will apply to photographs taken using the
viewfinder.
Live view switch