
Owner's Manual
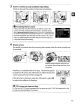
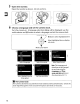


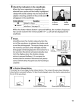
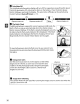

Table Of Contents
- Quick Start Guide
- Users Manual
- Reference Manual (Supplied on CD-ROM)
- Using This Manual
- Table of Contents
- Parts & Controls
- Getting Started
- Basic Photography
- Creative Photography (Scene Modes)
- More on Photography
- Shooting in P, S, A, & M Modes
- Live View - Framing Photographs in the Monitor
- Recording and Viewing Movies
- Shooting with Special Effects
- More on Playback
- Setup / Menus
- Connection to a Computer
- Printing Photographs
- Playback on a TV
- Compatible Lenses
- Optional Accessories
- Memory Card Compatibility
- Care / Maintenance
- List of Available Settings
- Troubleshooting
- Error Messages
- Specs
- Index
- Scans of CD-ROMs
- Warranty

S
Open
the
monitor.
Open the
monitor
as
shown.
Do
not
use force.
------------------------------
6 Choose a
language
and
set
the
camera clock.
Turn
the
camera on. A language-selection dialog will be displayed;
use
the
multi
selector and ®
button
to
select a language and set the camera clock.
Move
cursor
up
+_
/ ® button: select highlighted item
@@
n
~.
Select highlighted item
or
display
<l
OK
I>
+
sub-menu
\1
..
Move
cursor
down
Select daylight saving Set time and date
time option
Select language
@ @
Select time zone Select date format
Note:
The
language and
date/time
can
be changed
at
any time using the
Language and Time
zone
and
date options
in
the setup menu
(rn
11).
14
,.
The Camera Clock
The
camera
clock
is
less accurate
than
most
watches
and
household clocks. Check
the
clock regularly against more accurate
time
pieces
and
reset as necessary.