
Owner's Manual
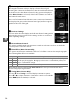

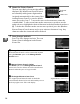


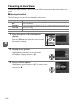
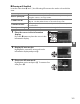

Table Of Contents
- Quick Start Guide
- Users Manual
- Reference Manual (Supplied on CD-ROM)
- Using This Manual
- Table of Contents
- Parts & Controls
- Getting Started
- Basic Photography
- Creative Photography (Scene Modes)
- More on Photography
- Shooting in P, S, A, & M Modes
- Live View - Framing Photographs in the Monitor
- Recording and Viewing Movies
- Shooting with Special Effects
- More on Playback
- Setup / Menus
- Connection to a Computer
- Printing Photographs
- Playback on a TV
- Compatible Lenses
- Optional Accessories
- Memory Card Compatibility
- Care / Maintenance
- List of Available Settings
- Troubleshooting
- Error Messages
- Specs
- Index
- Scans of CD-ROMs
- Warranty

101
x
❚❚ Choosing an AF-Area Mode
In modes other than i and j, the following AF-area modes can be selected in live
view:
1 Place the cursor in the information
display.
Press the P button to place the cursor in the
information display.
2 Display AF-area modes.
Highlight the current AF-area mode in the
information display and press J.
3 Choose an AF-area mode.
Highlight an option and press J.
To return to live
view, press P.
Option Description
6 Face-priority AF
The camera automatically detects and focuses on portrait subjects
facing the camera.
Use for portraits.
7 Wide-area AF
Use for hand-held shots of landscapes and other non-portrait
subjects.
Use the multi selector to select the focus point.
8 Normal-area AF
Use for pin-point focus on a selected spot in the frame.
A tripod is
recommended.
9 Subject-tracking AF Track a selected subject as it moves through the frame.
P button