
Owner's Manual


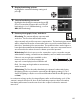

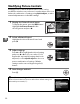
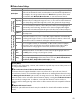
Table Of Contents
- Quick Start Guide
- Users Manual
- Reference Manual (Supplied on CD-ROM)
- Using This Manual
- Table of Contents
- Parts & Controls
- Getting Started
- Basic Photography
- Creative Photography (Scene Modes)
- More on Photography
- Shooting in P, S, A, & M Modes
- Live View - Framing Photographs in the Monitor
- Recording and Viewing Movies
- Shooting with Special Effects
- More on Playback
- Setup / Menus
- Connection to a Computer
- Printing Photographs
- Playback on a TV
- Compatible Lenses
- Optional Accessories
- Memory Card Compatibility
- Care / Maintenance
- List of Available Settings
- Troubleshooting
- Error Messages
- Specs
- Index
- Scans of CD-ROMs
- Warranty

90
t
A The Bracketing Progress Indicator
During AE bracketing, progress is shown by the bracketing
indicator in the information display:
• v: Camera ready to take first shot.
• w: Camera ready to take second shot.
• x: Camera ready to take third shot.
During ADL bracketing, the amount of Active D-Lighting that will
be used with the next shot is underlined in the information display.
A Disabling Bracketing
To disable bracketing and resume normal shooting, select OFF in Step 4 on the previous
page.
To cancel bracketing before all frames have been recorded, rotate the mode dial to a
setting other than P, S, A, or M.
A Exposure Bracketing
The camera modifies exposure by varying shutter speed and aperture (mode P), aperture
(mode S), or shutter speed (modes A and M).
If auto ISO sensitivity control is enabled in
modes P, S, and A, the camera will automatically vary ISO sensitivity for optimum exposure
when the limits of the camera exposure system are exceeded; in mode M, the camera will first
use auto ISO sensitivity control to bring exposure as close as possible to the optimum and
then bracket this exposure by varying shutter speed.
A See Also
For information on using the Fn button and the command dial to choose the bracketing
increment, see page 165.