
Owner's Manual
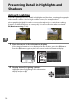
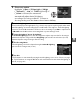


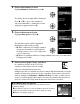

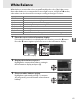
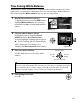
Table Of Contents
- Quick Start Guide
- Users Manual
- Reference Manual (Supplied on CD-ROM)
- Using This Manual
- Table of Contents
- Parts & Controls
- Getting Started
- Basic Photography
- Creative Photography (Scene Modes)
- More on Photography
- Shooting in P, S, A, & M Modes
- Live View - Framing Photographs in the Monitor
- Recording and Viewing Movies
- Shooting with Special Effects
- More on Playback
- Setup / Menus
- Connection to a Computer
- Printing Photographs
- Playback on a TV
- Compatible Lenses
- Optional Accessories
- Memory Card Compatibility
- Care / Maintenance
- List of Available Settings
- Troubleshooting
- Error Messages
- Specs
- Index
- Scans of CD-ROMs
- Warranty

83
t
Fine-Tuning White Balance
White balance can be “fine tuned” to compensate for variations in the color of the
light source or to introduce a deliberate color cast into an image.
White balance is
fine tuned using the White balance option in the shooting menu.
1 Display white balance options.
To display the menus, press the G button.
Highlight White balance in the shooting
menu and press 2 to display white balance
options.
2 Select a white balance option.
Highlight an option other than Preset
manual and press 2 (if Fluorescent is
selected, highlight a lighting type and press
2).
The fine-tuning options shown at right
will be displayed.
Fine-tuning is not
available with Preset manual white balance.
3 Fine tune white balance.
Use the multi selector to fine-tune white
balance.
4 Save changes and exit.
Press J.
A White Balance Fine Tuning
The colors on the fine-tuning axes are relative, not absolute.
For example, moving the
cursor to B (blue) when a “warm” setting such as J (incandescent) is selected will
make photographs slightly “colder” but will not actually make them blue.
G button
Coordinates
Adjustmen
t
Increase green
Increase
blue
Increase
amber
Increase magenta