
Owner's Manual
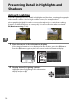


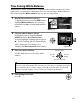
Table Of Contents
- Quick Start Guide
- Users Manual
- Reference Manual (Supplied on CD-ROM)
- Using This Manual
- Table of Contents
- Parts & Controls
- Getting Started
- Basic Photography
- Creative Photography (Scene Modes)
- More on Photography
- Shooting in P, S, A, & M Modes
- Live View - Framing Photographs in the Monitor
- Recording and Viewing Movies
- Shooting with Special Effects
- More on Playback
- Setup / Menus
- Connection to a Computer
- Printing Photographs
- Playback on a TV
- Compatible Lenses
- Optional Accessories
- Memory Card Compatibility
- Care / Maintenance
- List of Available Settings
- Troubleshooting
- Error Messages
- Specs
- Index
- Scans of CD-ROMs
- Warranty

75
t
3 Choose an option.
Highlight Y Auto, Z Extra high, P High,
Q Normal, R Low, or ! Off and press J.
If
Y Auto is selected, the camera will
automatically adjust Active D-Lighting
according to shooting conditions.
To return to
shooting mode, press the shutter-release button halfway.
D Active D-Lighting
Noise (randomly-spaced bright pixels, fog, or lines) may appear in photographs taken with
Active D-Lighting.
Uneven shading may be visible with some subjects.
Active D-Lighting
can not be used at ISO sensitivities of Hi 0.3 or above. A setting of Y Auto is equivalent to
Q Normal in mode M or when center-weighted or spot metering is used.
A “Active D-Lighting” Versus “D-Lighting”
The Active D-Lighting option in the shooting menu adjusts exposure before shooting to
optimize the dynamic range, while the D-Lighting option in the retouch menu (0 178)
optimizes dynamic range in images after shooting.
A The Shooting Menu
Active D-Lighting can also be adjusted using the Active D-Lighting
option in the shooting menu (0 151).
A See Also
For information on automatically varying Active D-Lighting over a series of shots, see page
88.
For information on using the Fn button and command dial to turn Active D-Lighting on
and off, see page 165.