
Owner's Manual


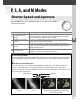
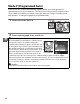

Table Of Contents
- Quick Start Guide
- Users Manual
- Reference Manual (Supplied on CD-ROM)
- Using This Manual
- Table of Contents
- Parts & Controls
- Getting Started
- Basic Photography
- Creative Photography (Scene Modes)
- More on Photography
- Shooting in P, S, A, & M Modes
- Live View - Framing Photographs in the Monitor
- Recording and Viewing Movies
- Shooting with Special Effects
- More on Playback
- Setup / Menus
- Connection to a Computer
- Printing Photographs
- Playback on a TV
- Compatible Lenses
- Optional Accessories
- Memory Card Compatibility
- Care / Maintenance
- List of Available Settings
- Troubleshooting
- Error Messages
- Specs
- Index
- Scans of CD-ROMs
- Warranty

56
z
Interval Timer Photography
The camera is equipped to take photographs automatically at preset intervals.
1 Select Interval timer shooting.
Press the G button to display the menus.
Highlight Interval timer shooting in the
shooting menu and press 2.
2 Choose a starting time.
Choose from the following starting triggers.
• To start shooting immediately, highlight Now
and press 2.
Shooting begins about 3 s
after settings are completed; proceed to
Step 3.
• To choose a starting time, highlight Start time
and press 2 to display the start time
options shown at right.
Press 4 or 2 to
highlight hours or minutes and press 1 or
3 to change.
Press 2 to continue.
3 Choose the interval.
Press 4 or 2 to highlight hours, minutes, or
seconds and press 1 or 3 to choose an
interval longer than the slowest anticipated
shutter speed.
Press 2 to continue.
D Before Shooting
Before beginning interval timer photography, take a test shot at current settings and view
the results in the monitor. To ensure that shooting starts at the desired time, check that the
camera clock is set correctly (0 170).
Use of a tripod is recommended.
Mount the camera on a tripod before shooting begins.
To
ensure that shooting is not interrupted, be sure the battery is fully charged or use an
optional EH-5b AC adapter and EP-5A power connector.
G button