
Owner's Manual


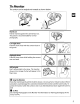
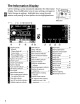
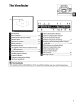
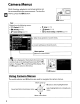
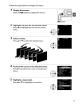
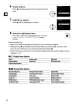

Table Of Contents
- Quick Start Guide
- Users Manual
- Reference Manual (Supplied on CD-ROM)
- Using This Manual
- Table of Contents
- Parts & Controls
- Getting Started
- Basic Photography
- Creative Photography (Scene Modes)
- More on Photography
- Shooting in P, S, A, & M Modes
- Live View - Framing Photographs in the Monitor
- Recording and Viewing Movies
- Shooting with Special Effects
- More on Playback
- Setup / Menus
- Connection to a Computer
- Printing Photographs
- Playback on a TV
- Compatible Lenses
- Optional Accessories
- Memory Card Compatibility
- Care / Maintenance
- List of Available Settings
- Troubleshooting
- Error Messages
- Specs
- Index
- Scans of CD-ROMs
- Warranty

Camera Menus
Most shooting, playback, and setup options can
be accessed from the camera menus.
To
view the
menus, press the
MENU
button.
•
,/:
Setup
(CD
11)
•
c!J:
Retouch
(CD
11)
•
~/~:
Recent
settings
or
My
Menu
(OJ
11)
8
Tabs
-,
Choose from the following menus:
•
~:
Playback
(CD
10)
•
0:
Shooting
(CD
10)
•
,:
Custom
Settings
(CD
11)
SETUP
MENU
Slider shows position in currentmenu.
Currentsettings are shown byicons.
Menuoptions
----,
"----------;
Options in current menu.
0----------------,
If
a 8 icon
is
displayed
at
the
bottom
leftcorner
of
the
monitor, help can be displayed bypressing the
?
(~)
button.
Press'"
or
~
to scroll
through
the display.
Press
?
(~~)
again
to return to the menus.
Using Camera Menus
The multi selector and ®
button
are used
to
navigate the camera menus.
Move cursor up
+_
/ @
button:
select
highlighted
item
C
I
d
t t
·
~@6X\.
Select highlighteditem
or
display sub-
ance
an
re
urn 0 prevIous
menu
+
<l
OK
C>
+
menu
\1
..
Move cursor
down