
Owner's Manual
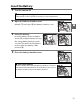


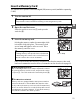
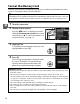
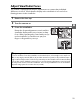
Table Of Contents
- Quick Start Guide
- Users Manual
- Reference Manual (Supplied on CD-ROM)
- Using This Manual
- Table of Contents
- Parts & Controls
- Getting Started
- Basic Photography
- Creative Photography (Scene Modes)
- More on Photography
- Shooting in P, S, A, & M Modes
- Live View - Framing Photographs in the Monitor
- Recording and Viewing Movies
- Shooting with Special Effects
- More on Playback
- Setup / Menus
- Connection to a Computer
- Printing Photographs
- Playback on a TV
- Compatible Lenses
- Optional Accessories
- Memory Card Compatibility
- Care / Maintenance
- List of Available Settings
- Troubleshooting
- Error Messages
- Specs
- Index
- Scans of CD-ROMs
- Warranty

17
X
Attach a Lens
Care should be taken to prevent dust from entering the camera when the lens is
removed.
The lens generally used in this manual for illustrative purposes is an AF-S
DX NIKKOR 18–55mm f/3.5–5.6G VR.
1 Turn the camera off.
2 Remove the rear lens cap and the
camera body cap.
3 Attach the lens.
Keeping the mounting mark on the lens
aligned with the mounting mark on the
camera body, position the lens in the
camera’s bayonet mount (
q
). Being
careful not to press the lens-release
button, rotate the lens counter-
clockwise until it clicks into place (
w
).
Slide the A-M mode switch to A
(autofocus; if the lens has an M/A-M
switch, select M/A for autofocus with
manual override).
D Autofocus
Autofocus is supported with only AF-S and AF-I lenses, which are equipped with autofocus
motors.
Autofocus is not available with other AF lenses (0 197).
Focal length scale
Focal length mark
A-M mode switch (see below)
VR (vibration reduction) switch (0 18)
Mounting mark
Rear lens cap
Lens cap
Focus ring (0 45, 106)
CPU contacts
(0 198)
Zoom ring (0 29)