
Owner's Manual


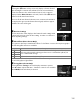

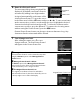

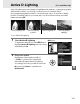

Table Of Contents
- Quick Start Guide
- Users Manual
- Q&A Index
- Table of Contents
- For Your Safety
- Notices
- Introduction
- Basic Photography and Playback
- Live View
- Recording and Viewing Movies
- P, S, A, and M Modes
- User Settings: U1 and U2 Modes
- Release Mode
- Image Recording Options
- Focus
- ISO Sensitivity
- Exposure/Bracketing
- White Balance
- Image Enhancement
- Flash Photography
- Other Shooting Options
- More on Playback
- Connections
- Menu Guide
- The Playback Menu: Managing Images
- The Shooting Menu: Shooting Options
- Custom Settings:Fine-Tuning Camera Settings
- Reset Custom Settings
- a: Autofocus
- b: Metering/Exposure
- c: Timers/AE Lock
- d: Shooting/Display
- d1: Beep
- d2: Viewfinder Grid Display
- d3: ISO Display and Adjustment
- d4: Viewfinder Warning Display
- d5: Screen Tips
- d6: CL Mode Shooting Speed
- d7: Max. Continuous Release
- d8: File Number Sequence
- d9: Information Display
- d10: LCD Illumination
- d11: Exposure Delay Mode
- d12: Flash Warning
- d13: MB-D11 Battery Type
- d14: Battery Order
- e: Bracketing/Flash
- f: Controls
- The Setup Menu: Camera Setup
- The Retouch Menu:Creating Retouched Copies
- My Menu/Recent Settings
- Technical Notes
- Scan of CD-ROM
- Lens Warranty
- Camera Warranty

137
J
6 Name the Picture Control.
The text-entry dialog shown at right will be
displayed.
By default, new Picture Controls
are named by adding a two-digit number
(assigned automatically) to the name of the
existing Picture Control.
To move the cursor
in the name area, hold the W button and press 4 or 2.
To enter a new letter
at the current cursor position, use the multi selector to highlight the desired
character in the keyboard area and press J.
To delete the character at the
current cursor position, press the O button.
To return to the shooting menu
without saving the Picture Control, press the G button.
Custom Picture Control names can be up to nineteen characters long.
Any
characters after the nineteenth will be deleted.
7 Save changes and exit.
After editing the name, press X to save
changes and exit.
The new Picture Control
will appear in the Picture Control list.
A Manage Picture Control > Rename
Custom Picture Controls can be renamed at any time
using the Rename option in the Manage Picture
Control menu.
A Manage Picture Control > Delete
The Delete option in the Manage Picture Control
menu can be used to delete selected custom Picture
Controls when they are no longer needed.
A The Original Picture Control Icon
The original preset Picture Control on which the
custom Picture Control is based is indicated by an icon
in the top right corner of the edit display.
Original Picture Control icon
Keyboard
area
Name area