
Owner's Manual
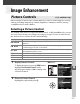


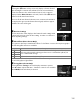

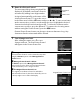

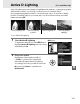

Table Of Contents
- Quick Start Guide
- Users Manual
- Q&A Index
- Table of Contents
- For Your Safety
- Notices
- Introduction
- Basic Photography and Playback
- Live View
- Recording and Viewing Movies
- P, S, A, and M Modes
- User Settings: U1 and U2 Modes
- Release Mode
- Image Recording Options
- Focus
- ISO Sensitivity
- Exposure/Bracketing
- White Balance
- Image Enhancement
- Flash Photography
- Other Shooting Options
- More on Playback
- Connections
- Menu Guide
- The Playback Menu: Managing Images
- The Shooting Menu: Shooting Options
- Custom Settings:Fine-Tuning Camera Settings
- Reset Custom Settings
- a: Autofocus
- b: Metering/Exposure
- c: Timers/AE Lock
- d: Shooting/Display
- d1: Beep
- d2: Viewfinder Grid Display
- d3: ISO Display and Adjustment
- d4: Viewfinder Warning Display
- d5: Screen Tips
- d6: CL Mode Shooting Speed
- d7: Max. Continuous Release
- d8: File Number Sequence
- d9: Information Display
- d10: LCD Illumination
- d11: Exposure Delay Mode
- d12: Flash Warning
- d13: MB-D11 Battery Type
- d14: Battery Order
- e: Bracketing/Flash
- f: Controls
- The Setup Menu: Camera Setup
- The Retouch Menu:Creating Retouched Copies
- My Menu/Recent Settings
- Technical Notes
- Scan of CD-ROM
- Lens Warranty
- Camera Warranty

136
J
Creating Custom Picture Controls
The Picture Controls supplied with the camera can be modified and saved as custom
Picture Controls.
1 Select Manage Picture Control.
To display the menus, press the G button.
Highlight Manage Picture Control in the
shooting menu and press 2.
2 Select Save/edit.
Highlight Save/edit and press 2.
3 Select a Picture Control.
Highlight an existing Picture Control and
press 2, or press J to proceed to step 5 to
save a copy of the highlighted Picture
Control without further modification.
4 Edit the selected Picture Control.
See page 134 for more information.
To
abandon any changes and start over from
default settings, press the O button.
Press J
when settings are complete.
5 Select a destination.
Highlight a destination for the custom
Picture Control (C-1 through C-9) and
press 2.
G button