
Owner's Manual
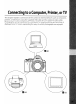

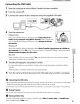


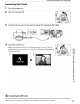


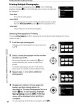
Table Of Contents
- Quick Start Guide
- Owners Manual
- Reset
- Two-Button Reset
- Image Quality & Size
- Setting Language / Time / Date
- Using This Manual
- Table of Contents
- Supplied Accessories
- Parts & Controls
- Getting Started
- Basic Photography
- Basic Playback
- Advanced Photography
- Advanced Playback
- Printing Photographs
- Setup / Menus
- Optional Accessories
- Care / Maintenance
- Troubleshooting
- Error Messages
- Specs
- Index
- Scan of Software CD-ROM
- D60 Gold Edition Note
- Capture NX2 Software Trial
- Warranty

Printing
Via
Direct
USB
Connection
Printing Photographs One
at
a Time
1
Press
the multi
selector
left
or
right
in
the
PictBridge
playback
display
(~
85)
to
~
choose
a photograph. 0
To view
six
photographs at a time,
press
~lEl
or
press
.:.
~
to
display the highlighted photograph full frame.
Press
~
to
zoom in on the current photograph.
Photographs can be selected while checking details using the same operations available
with
playback zoom
(til
77)
.
No.
of
copies
Press
the multi selector
up
or
down
to
choose number
of
copies (maximum
99),
then press
OK
to
select and return
to
the setup screen.
Page
size
Press
the multi selector
up
or
down
to
choose page
size.
Only paper
sizes
supported by the current printer among
Printer default (print at current printer settings),
3.5 x 5 in., 5 x 7 in.,
100
x
150
mm, 4 x 6 in.,
8 x
10
in., Letter, A3, A4 will be displayed.
Press
OK
to
select and return
to
the setup screen.
3
Set
each
option
in
Setup.
Press
the multi selector
up
or
down
to
highlight
an
option and press
to
the right
to
select.
..
_-
..
-
._
.....
_"
..
"._,..
.
....
"
....
-
....
----"
..
-
..
2
Press
OK.
The menu shown at right will be displayed.
o
"'
(')
o
::J
::J
(l)
n
::!.
::J
10
8
OJ
(')
o
3
"0
r:::
....
(l)
.:'
Border
Press
the multi selector
up
or
down
to
choose print style
from
Printer default (print at current printer settings),
Print with border (print
photo
with
white border),
or
No
border,
then press
OK
to
select and return
to
the setup
screen.
Border can be selected only when supported by the
current printer.
86