
Owner's Manual
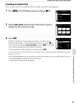

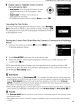

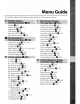


Table Of Contents
- Quick Start Guide
- Owners Manual
- Reset
- Two-Button Reset
- Image Quality & Size
- Setting Language / Time / Date
- Using This Manual
- Table of Contents
- Supplied Accessories
- Parts & Controls
- Getting Started
- Basic Photography
- Basic Playback
- Advanced Photography
- Advanced Playback
- Printing Photographs
- Setup / Menus
- Optional Accessories
- Care / Maintenance
- Troubleshooting
- Error Messages
- Specs
- Index
- Scan of Software CD-ROM
- D60 Gold Edition Note
- Capture NX2 Software Trial
- Warranty

Printing
Via
Direct
USB
Connection
Creating an
Index
Print
Print
"contact
sheets"
of
small
thumbnail
images
of
all
JPEG
photographs
.
...
-
_.
__
_
__
,_
••..
__
.•.......
__
__
..
,
..
,-_._-----,--_
,
..
--
-~_.,_
•..
_._--~_.
...-
..•...•
-,.-.-.
--
--
_
_,-.-
...•.•..•.....
1
Press
MENU
in
the PictBridge playback display
(t1!
85).
2 Select
Index
print
and press the multi selector right
to
display
the
menu shown
at
right.
3
Press
OK.
Display print options. Choose page
size,
border, and time stamp
options
as
described in "Printing Photographs One at a Time"
(tyj
86).
To
start printing, highlight Start printing and
press
OK. PictBridge
menu will be displayed
when
printing
is
complete.
To
cancel printing while printing
is
in
progress,
press
OK.
Contact sheets cannot be printed on some paper
sizes.
A warning will be displayed
if
selected
page
is
too
small.
Up
to
256 photographs can be printed. Not
all
of
photographs can be printed
if
there
are
257
or
more photographs recorded on the memory card.
A confirmation dialog will be displayed.
....
o
QJ
(")
o
3
"0
C
....
ID
-~
o
~
89