
Owner's Manual
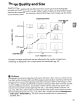

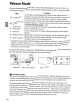


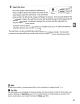
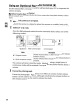


Table Of Contents
- Using the Supplied Manuals
- Quick Start Guide
- Owners Manual
- Two-Button Reset
- Set Language / Time
- Table of Contents
- Q & A Index
- Supplied Accessories
- Parts & Controls
- Getting Started
- Basic Photography & Playback
- Focus
- Image Size & Quality
- Release Mode
- Using the Built-In Flash
- ISO Sensitivity
- P, S, A, and M Modes
- Exposure
- White Balance
- Picture Controls
- Active D-Lighting
- Multiple Exposure
- Using an Optional GPS Unit
- More Playback Options
- Connecting to Other Devices
- Menu Guide
- Compatible Lenses
- Optional Flash Units
- Other Accessories
- Care / Maintenance
- Troubleshooting
- Error Messages
- Defaults
- Memory Card Capacity
- Specs
- Index
- Corrections to Manual
- Software Installation Instructions
- Scan of Software CD-ROM
- AC Power Cord Specs
- Warranty

Self-Timer
Mode
@
The self-timer
can
be used
to
reduce camera shake or for self-portraits.
1
Mount
the camera on a tripod.
Mount
the
camera on a
tripod
or place
the
camera on a stable, level surface.
2 Select
~
mode.
Press
the
QlJ
button
and rotate the main command dial until
~
is
displayed in
the
control panel.
Controlpanel
3 Frame the photograph.
Frame the photograph. Before taking a photograph
with
the flash in
P,
S,
A,
or M
modes (pg.
78),
press the
~
button
to
raise
the
flash and wait for the
~
indicator
to
be displayed in the viewfinder (pg.
70).
The
timer
will stop
if
the
flash
is
raised after the
timer
has
started.
66
~
Cover
the
Viewfinder
After framing the photograph, remove the
viewfinder eyepiece cup and insert the
supplied
DK-5
eyepiece cap
as
shown. This
prevents light entering via the viewfinder
interfering
with
exposure.