
Owner's Manual

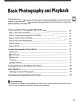


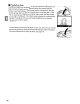
Table Of Contents
- Using the Supplied Manuals
- Quick Start Guide
- Owners Manual
- Two-Button Reset
- Set Language / Time
- Table of Contents
- Q & A Index
- Supplied Accessories
- Parts & Controls
- Getting Started
- Basic Photography & Playback
- Focus
- Image Size & Quality
- Release Mode
- Using the Built-In Flash
- ISO Sensitivity
- P, S, A, and M Modes
- Exposure
- White Balance
- Picture Controls
- Active D-Lighting
- Multiple Exposure
- Using an Optional GPS Unit
- More Playback Options
- Connecting to Other Devices
- Menu Guide
- Compatible Lenses
- Optional Flash Units
- Other Accessories
- Care / Maintenance
- Troubleshooting
- Error Messages
- Defaults
- Memory Card Capacity
- Specs
- Index
- Corrections to Manual
- Software Installation Instructions
- Scan of Software CD-ROM
- AC Power Cord Specs
- Warranty

40
• The Built-in Flash
If
additional lighting
is
required for correct exposure in
A8°
mode, the
built-in flash will pop
up
automatically when the shutter-release
button
is
pressed halfway.
Flash
range varies
with
aperture and
ISO
sensitivity (pg. 266); remove lens hoods when using the flash.
If
the
flash
is
raised, photographs
can
only be taken when the flash-ready
indicator
(~)
is
displayed. If the flash-ready indicator
is
not
displayed,
the flash
is
charging; remove your finger briefly from the shutter-
release
button
and
try
again.
To
save
battery power when the flash
is
not
in
use,
return
it
to
its closed
position by pressing
it
gently downward till the latch clicks into place.
For
more information on using the flash,
see
page
70.